Operation Christmas Drop 2012 from Samuel Morse on Vimeo / YouTube.
Ever since the Operation Christmas Drop video went live, I have received a lot of questions about how I put the video together and how I managed to get the feel and emotion that permeates the video. Truth is, there were a lot of factors that played into it, a bit of help from a few key people. The factors could be grouped into the following categories (not necessarily in order of importance): the steadicam, in-flight documentation techniques, the interviews, the music and sound design, the scope and perspective of the video, and the editing.
Accolades:
1st Place, Video Documentary — Pacific Air Forces Media Contest
2nd Place, Multimedia — NPPA Monthly Multimedia Contest
3rd Place, Video Documentary – Air Force Media Contest
3rd Place, Multimedia Feature — Military Photographer of the Year Competition
I apologize in advance if this is a little disorganized, but there’s a lot of information, and I didn’t necessarily have the time or energy to go through and edit this a lot. At the very least, I’ve broken it into sections.
Here’s a quick navigation list
Scope and Perspective
The Music
In-Flight Videography
In-Flight Photography
Good Cockpit Shots
Quick-Release Quandry
Editing
Equipment
Equipment used by shot/timecode
Scope and Perspective [top]
This may sound redundant, but like any story, the story is the most important part. This video would not have the popularity it has without a good story behind it.
Over the years, this yearly event has been covered by a lot of different people and a lot of different ways, but usually they go with a news perspective. They list the facts of what happened and where, emphasizing facts and figures over emotion. This isn’t necessarily a bad thing. There’s a time and place for that kind of coverage, but I knew my audience wouldn’t go for that.
I’m a social media kind of guy, so one of my big goals was to make this thing go viral. This meant that I needed to go after the emotion of what was going on rather than simply stating facts–going after the who and why rather than the what. Early on, I made the conscious decision that the drops themselves would only be a small piece of the story. It would be the climax, but not the focus.
I also lucked out that last year MSgt Cameron Leslie (in the video) decided to go out to the islands to capture the islanders’ perspective. It simply wasn’t feasible for me to do that myself, and certainly not in the timeframe I had, so I was able to tell their story through his eyes. Add to that the fact that he’s an excellent photographer, and we were “cooking with grease” as they say.
The basic flow I went with was having a lead with some emotional quotes to support the importance of the story and hook the viewer in, then dialing back to show the background and history, then talk about the planning and preparation that goes into this, climax at the drop, and then revisit the emotional impact of the mission. That basic flow is still in the final version of the video, although some of the details changed. The first major change that happened was the context of the opening, switching from a typical “guy gets ready to head out” kind of opening, to an opening that gets right into the action right away. The other was the addition of the segment talking about the restructuring of the bundles due to the added weight. This was not anticipated, so I could not have known about it ahead of time.
The Music [top]
Most U.S. Air Force videos don’t have music in them. Whether it be that the timeframe doesn’t allow for it, the broadcaster didn’t know how, or just that it isn’t appropriate for the given story, the end result is that most videos don’t have music. Being a musician myself and given the fact that this is an emotional story, music was almost a must.
Non-musicians don’t always realize that the music tells the story just as much as the words or visuals. I’ve been told that the music “seems to fit perfectly.” Well, that’s because the music was written for the video and a lot of time and effort was put into finding ways to tell the story in an auditory fashion.
It started with the instrumentation. I wanted to capture the feeling of the islanders but also of the Air Force. I also wanted the music to be driving a bit to create tension and make the viewer want to keep watching. This lead me to using a combination of ethnic instruments such as a pan flute and drums, as well as more traditional western instrumentation.
For the music itself, I began with the drum groove. There are essentially two drum grooves in the whole piece, with some additional instruments that come and go to keep it from getting too monotonous. I went with a 3/4 pattern to keep the piece from having too much of a western militaristic 4/4 feel, while still being capable of driving the story. The first drum groove is designed to follow the 3/4 pattern very closely with lots of subdivision to make a flowing but constant groove, meant to evoke the rhythmic nature of watching waves disappear under the nose of a flying aircraft. The second pattern is more loose and syncopated, made to relieve that driving nature and relax a bit. Sometimes these patterns are used in tandem, even alternating mid-groove to add variety. A large bass drum and suspended cymbal augment the pattern at the two climax points (beginning title reveal and the drops) to add weight in those areas.
I mentioned that the opening drum groove is meant to be an audio mimic to waves disappearing under the nose of a low-flying C-130. To add the C-130 into the picture, I added a drone of swelling and receding chords on french horn. Over that, the main melodic theme is introduced on pan flute, which is South American, but still has a somewhat nondescript tribal nature to it. Afterwards, it’s echoed on violin set to a lower register so it continues, but without being distracting. Piano comes in as a soothing groove-based instrument, helping the music to recede into the background during the interviews.
Eventually, the music switches the chord progression and adds in marimba. This gives a break to the swelling french horn chords. The marimba also takes on an island-ish feel, almost sounding like a lower, softer steel drum. I don’t know if the islands of Micronesia actually have their own musical style, but I tried to create an overall ethnic feel without using anything too specific to a given country or region to it stayed generic.
The build to the drops themselves added in some sound design in the video. I put a lavalier (lapel) mic into my headset on the flight deck to record audio of the radio chatter leading up to the drop. I used some general background noise and the specific cues that the drop is coming up, including “hot pass” which means the aircraft is making its final approach to drop its cargo, “five seconds” and “green light”, etc. In the meantime, electric guitar and a few other instruments start building, and the bass drum comes back in. Full orchestra takes over at the climax and then recedes back for the closing quote from MSgt Leslie.
As far as workflow, I created a fair amount of the music before I even left on the trip. I knew what my story would be, so I created the opening and finale, which I knew would be the hardest to produce. That meant that all I really had to do to make the music downrange was to expand the middle section, loop some grooves, and put the finishing touches. I sliced up the original audio file so I could loop certain sections in FinalCut Pro X. That also gave me the latitude to edit to the music so I had something to go off of. Once I had a more finalized cut, I went back and expanded the music to fit the video perfectly with seamless transitions and looping.
In-Flight Videography [top]
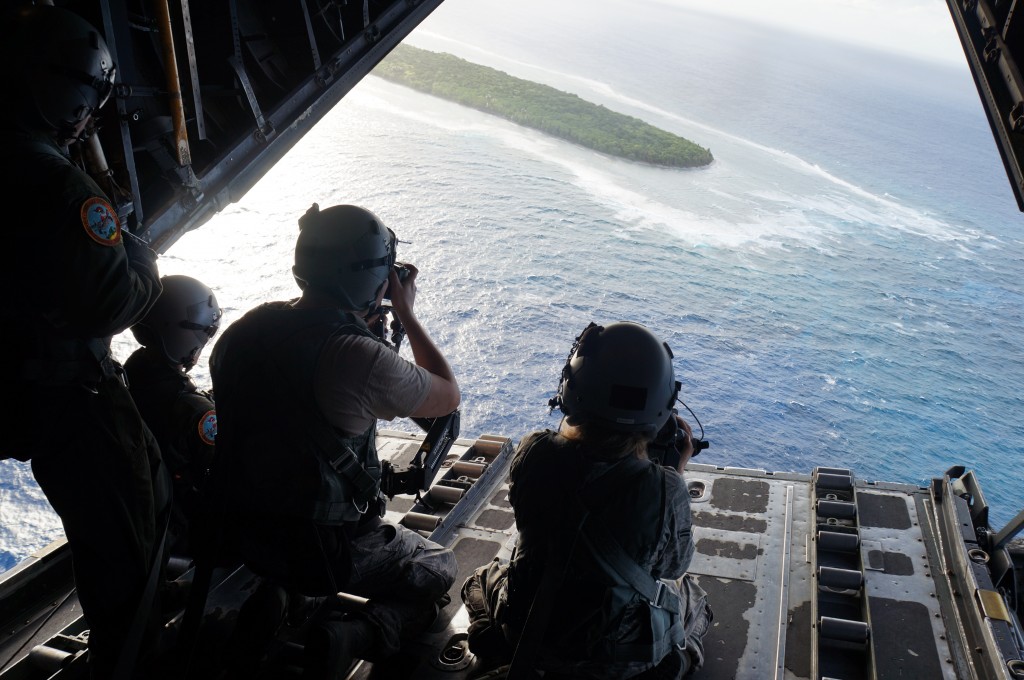
Of course, the coolest looking part of the video is the aerial footage. However, anyone who’s tried to take video from a C-130 knows that getting stable footage and unique angles is near impossible because of how rocky the ride is and the limited space. So, I had to think outside the box and employ a lot of non-standard gear to make it happen.
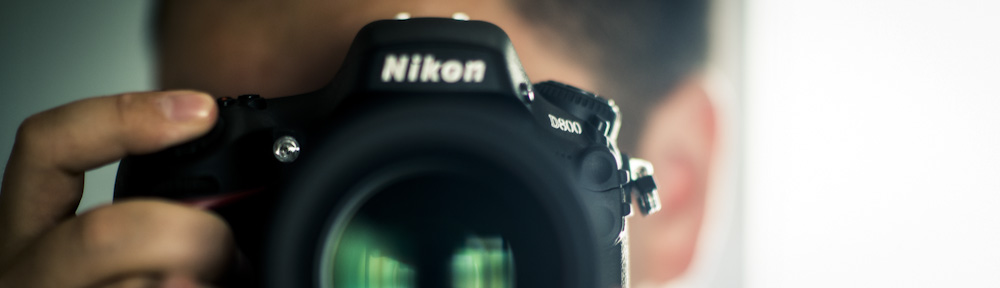
Probably my most useful piece of gear for videography was my pair of Manfrotto Super Clamps. I thought they were useful before, but even more so now. With those clamps, I was able to mount anything from flashes to my Nikon D800 to almost any spot on the aircraft. I found attaching a sturdy photography head to the Super Clamp worked the best for cameras, while articulating arms worked well for the flashes. The clamps also allowed me to get angles that would have been impossible for me to shoot from, including the overhead slow mo clip shot on the Sony NEX-7, or the unbelievable inward-looking angle shot with a GoPro. Clamps were used for every non-moving video clip.
So how do you get a moving shot on a C-130 and still make it buttery smooth?
For this quandary, I employed the use of a Steadicam Merlin 2. Steadicams, made by Tiffen, use a counterbalance and gimbal setup to let inertia stabilize the camera. Depending on how close the center of gravity is to the gimbal, tilting and panning shots can be really easy. For the opening shot of the video, the center of gravity was only just barely below the gimbal, allowing for that smooth camera move.
Unlike some Steadicams, the Merlin is very small and can be collapsed. It can also be hand-held. This was helpful in the cockpit shots because I could use it without the bulky iso-elastic arm and vest. Collapsing the Steadicam fits it into a space roughly the size of a 70-200mm lens with a teleconverter and the hood extended. I still used the arm and vest with the open door shots though, since doing so attached the camera to me much more securely than just hand-holding the Steadicam.
Using the Steadicam on the ramp shooting stills. Photo by Staff Sgt. Nickolas Alarcon
There are a few key points to remember with using a Steadicam with a dSLR:
- The balance is very delicate. Any changes to mounted equipment including microphones and lenses will require you to re-balance the Steadicam.
- Zoom lenses generally must be set to a single focal length since the moving glass elements will also throw off the balance.
- Rack focusing is impossible, since touching the camera itself will interrupt the steadiness of the shot. Use a smaller aperture if you need more working distance.
- Best bet for lenses is to use a few prime lenses that are similar in weight and size so you don’t need much re-balancing between shots. My two best lenses for this purpose are the Nikon 24mm f/1.4 and the 85mm f/1.4.
- Changes in G-force will affect the usability of the iso-elastic arm.
- Since the Steadicam uses inertia to stabilize the camera, the heavier the Steadicam is, the more stable it will be. On the other hand, if you don’t have the arm and vest, a heavy Steadicam will really wear on your arms after a long shoot.
- The closer you get to the edge of an open door on an aircraft, the more the wind will knock the camera around. This is more true with a Steadicam than handheld/clamp/tripod, so be careful.
- The more force you exert on the camera and the further from the gimbal that force is, the shakier the footage will be. Only move it with the ring around the gimbal as prescribed in the directions, and put only as much effort as is needed to guide the camera. Don’t force it.
- Be careful with the Merlin’s dovetail plate (read quick release plate). It’s my biggest beef with the Steadicam as it’s not remotely easy to take off the camera, but the plate itself is capable of sliding off the Steadicam without even being loosened in some cases. See the quick release quandary section for more info.
This is not to say that a Steadicam is the only way to go. Sliders and jibs can do the trick as well, but are less mobile and flexible with their application. Also, I still ended up using post process stabilization on a few shots, even some of the ones with the Steadicam, either due to vibrations in the plane itself shaking the mounted cameras or the wind buffeting the Steadicam.
Also, a quick note on using a Nikon F-mount adapter for the Sony NEX-7 (or other E-mount camera), be careful with the focus ring. I was using the Nikon 10.5mm fisheye on the NEX-7 for the slow motion shots. I didn’t realize this until two out of focus shoots, but the vibrations of the plane actually caused the lens to settle, shifting the focus. Once you get your focus, be sure to tape the focus ring down so the focus stays. I think this only applies to non-AF-S lenses though.
In-Flight Photography [top]
Thankfully, in-flight photography is a little easier. A lot of it comes down to faster shutter speeds than normal to get a sharp image. Believe it or not, the Steadicam helped with still images as well, making the total mass of the camera heavier without putting more strain on my hands. Vibration reduction (called image stabilization on non-Nikon cameras) helps as well.
However, there is one tricky technique that when pulled off correctly, works wonders. It’s the use of flash. 99% of the time I see flash used at the tail of a C-130, it’s either direct flash or a failed attempt at bounce flash. Unfortunately, the sides of a C-130 are too dark to effectively bounce off of. Also, it’s hard to get the required shutter speed to even use a flash in the first place without completely blowing out the background, so how do you get good imagery that doesn’t look like a silhouette? The answer is three-fold.
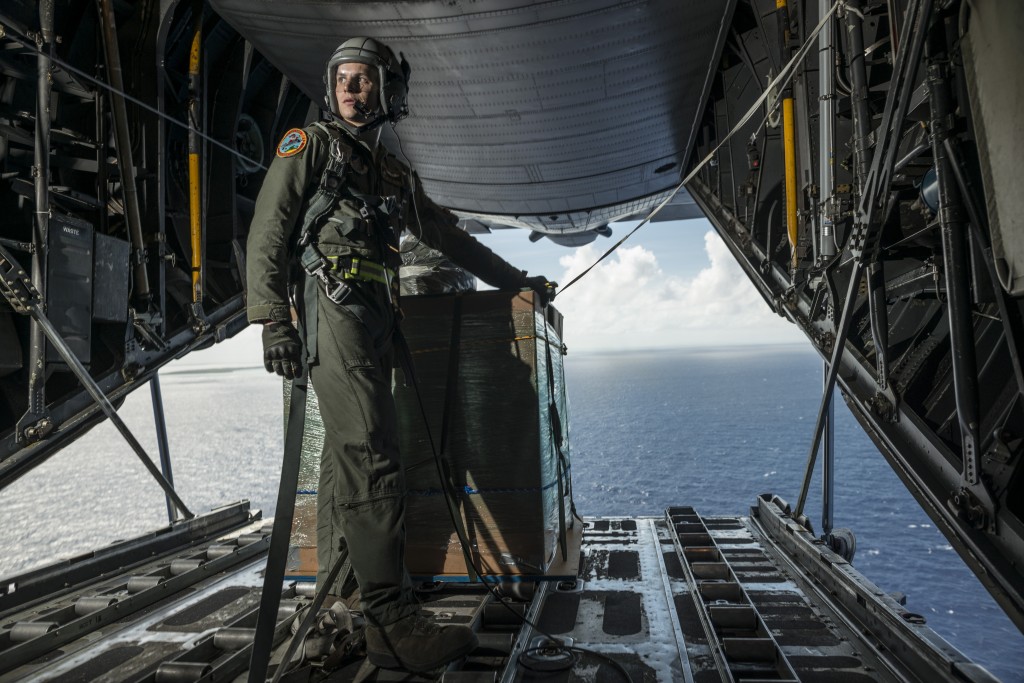
Photo using off-camera flash and a PocketWizard radio trigger.
1. Use a neutral density (ND) filter. I prefer either an ND8 or ND16 which give three or four stops of light blocking respectively. That allows you to darken the ambient light so you don’t have to close your aperture down to f/16 or f/22 just to get a properly exposed background at the 1/250 sec. shutter speed required to use a flash on a pro dSLR.
2. Get the flash off of the camera. Use the Manfrotto Super Clamps I mentioned before with an articulating arm to mount the flash to the side of the aircraft. Aim it where you want the light, and either use the built-in commander mode on your Nikon camera, or preferrably, use some sort of radio trigger to send the signal. I recommend using PocketWizard FlexTT5s and MiniTT1s to do the trick, as daylight will make Nikon’s infrared triggering system almost useless.
3. If a flash isn’t an option, wait until the light is coming from the side and directly illuminating your subject.
Good Cockpit Shots [top]
There are a few things that go into a good cockpit shot. Most people who have tried shooting photos or video in a cockpit know that it’s almost guaranteed that you’ll have a blown-out background or silhouetted foreground (sometimes both). I’ve discovered a few tricks to avoiding this, and surprisingly, none of them require flash, so they apply to videography as well.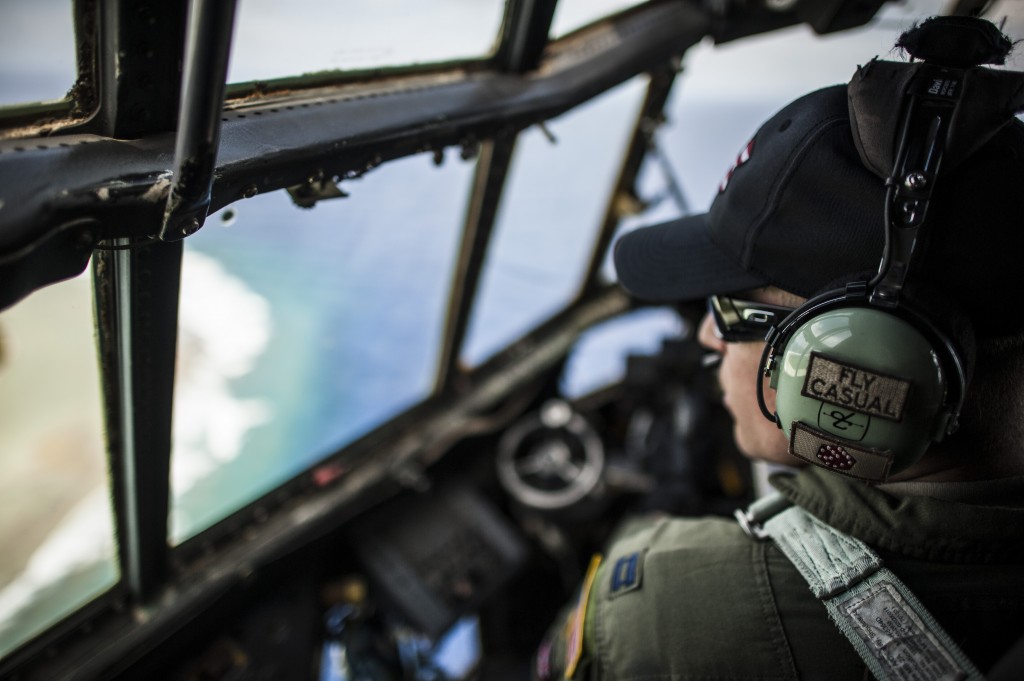
1. Start with a camera that has a good dynamic range. The D800 is an excellent choice for this with its 14.4 stop dynamic range.
2. Make sure you’re using that range. If you are shooting JPEG or video, you’ll need to change the picture setting to neutral so you flatten out the contrast. If you shoot raw, do highlight and shadow recovery in post production.
3. Shoot when the sun is in their eyes. This sounds terrible, but you want the sun to be shining directly into the cockpit. Side lighting is the best so people aren’t squinting, but either way, you need light. The best way to do this is to get dawn or sunset, but waiting until the plane banks just right works too.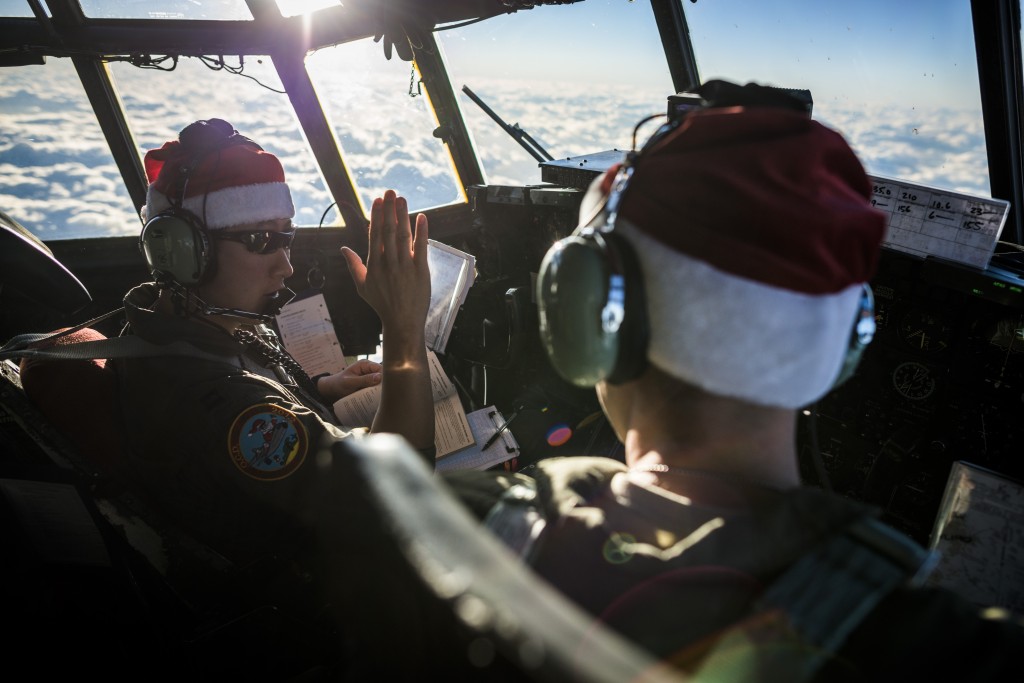
4. Get a darker background. Another way to even out exposure is to wait until the plane is banking so the ground is in view. The ground won’t be nearly as bright as the sky, so you’ll get a more even exposure.
Quick-Release Quandry [top]
This is possibly more of a convenience thing than a production thing, but convenience helps with response time. One thing I realized when I picked up the D800, knowing that I wanted to really get into video, was that my different support devices didn’t play well with each other. I use BlackRapid camera straps that screw into the tripod mount, which poses problems with using that mount later. I also had the Steadicam Merlin with its wonky quick release plate, and needed to use a tripod as well.
The answer came from Manfrotto and their 200PL quick release plate. The plate itself is reasonably good and not too big, so I could leave it on the camera all the time without issue, but it was still easy to take off for those few times I needed to do so. I was able to get an adapter from BlackRapid that replaces the standard turn-key tightener with something more robust that it could support the camera’s weight. I also put a plate adapter on the Steadicam, which had the bonus benefit of lifting the camera off of the base plate a little so larger lenses would clear the plate and stage. It also kept the dovetail plate in the same spot, so balancing out the camera was even easier than before.
Editing [top]
I cover a lot of the storytelling aspects of editing in the first section, so I won’t repeat myself. Instead, I’ll take a look at some of the editing techniques I used and challenges I had to overcome. This section will be a little disjointed, so apologies in advance. Also, some of the editing techniques are referenced in the shot-by-shot breakdown at the end of this article.
Editing was quite the handful. Being fairly new to the videography world, I overshot the heck out of this story, so I had a lot of footage to go through. Of course, it’s always better to have too much than not enough.
My drug of choice was FinalCut Pro X. Despite still having a few flaws and missing features in the program, it still has one of the shallowest learning curves for a pro-version software package. I also knew that I would be adding a lot of photos from MSgt Leslie and the historian, so having the built-in Ken Burns Effect was a huge plus. It also has some other nice features like making easy J and L cuts where the audio extends past the cut in either direction. The magnetic timeline takes some getting used to, but is not bad once you get the hang of it.
I also used Adobe AfterEffects CS6 for the main title. I had intended on using the technique for the lower thirds titling as well, but it proved time consuming and distracting. In any case, the basic method was relatively straightforward in AfterEffects CS6. I emphasize the version because I used a feature new to CS6: 3D Camera Tracking. Essentially, I took the clip and told AfterEffects to analyze it for camera motion. Once the assumed camera movement was tracked, I was able to create text in the 3D space and a virtual camera following the same motion tracking. That was the easy part.
The hard part was the lens flare from the sun that shows up. The issue was two-fold. First, the sudden surge of bright circles and lines across the image threw off the camera tracking a little, and then, the lighting dynamic changed drastically throughout the shot which needed to be matched on the text. The first part required me to keyframe the position of the text and raise or lower it to compensate for the inaccurate movement. The second part took keyframing the lighting to make it brighter and darker at the right moments to simulate the lens flare and lighting changes on the text. It took a lot of tries to make it work, but the final effect turned out great.
The dialogue audio was another challenge. I found that some audio that I had from an interview in a dining room was unusable because of the echo, so I had to re-record it. Other audio recorded for me was over-modulated (too loud). Yet more had wind or other artifacts in it. Then there was the challenge of making consecutive interviews connect and flow into each other.
For connecting the interviews, a lot of it came down to the method of interview. I made sure with each interview to get a few good transitional quotes going into and out of their area of expertise. Of course, the only way I could do that was to know how I wanted the story to flow ahead of time. All of the same things I would do in writing to connect sections had to be said by my SMEs. I made a conscious decision ahead of time to keep my voice out of the video entirely, which wasn’t easy in parts.
For cleaning up the dialog, a lot of trimming took place, getting rid of “ahs” and “ums” as well as some general processing. I applied both a noise gate filter and a compressor/limiter to help with background noise. The noise gate tells the audio to turn off if it drops below a threshold (with an option for a gradual attack and decay so the sound doesn’t just pop in and out). Using the look ahead option helps prevent initial syllables from getting cut off. After that, I applied the compressor which boosts volumes below a certain point and limits volumes above that threshold, which effectively evens out the volume of the interviews.
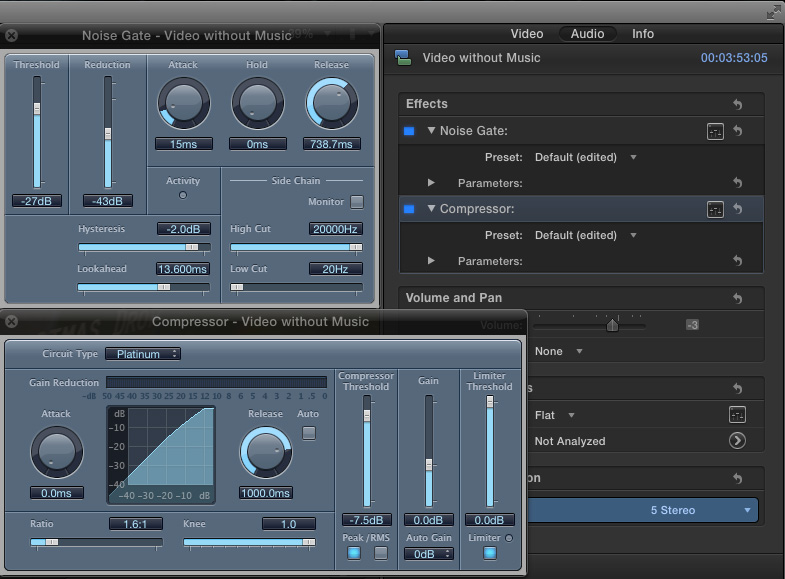
Compressor/Noise Gate settings
The radio chatter was pretty straight forward, just grabbing clips from a longer video I had where I put a lavalier mic in my headset to record the chatter. I used some background chatter/noise to give it some depth, overlaying the other chatter on top. Add some fade in/fade out to mask the white noise and you’re done.
I also did a bit of work on the footage from the Sony NEX-7. Several of the shots were a bit shaky because the bar in the C-130 I mounted the camera to was shaking a little. One of the downsides of the NEX-7, aside from having no audio level control, is that it has a bit of rolling shutter, which meant the shaky shots looked like jello. Thanks to FCPX’s built-in rolling shutter and shake reduction functions, I was able to make some of those shots better. I used shake reduction on a few of the D800 shots as well, but not with all of them because the Steadicam worked just fine.
Another thing I did was shoot some of the drops at 60 frames per second on the NEX-7. I then used the “conform frame rate” function to tell FCPX to play those clips back at the project’s 24 fps frame rate, effectively slowing the video to 40% of its original speed. That was particularly dramatic for the drops where you could see the chute slowly unfurling as it caught the wind.
In regards to overall clip choice and storytelling, a lot of that came down to “trimming the fat” to make sure I kept variety, but didn’t repeat myself or add extraneous information. For this, I have Preston Keres and his staff at Airman magazine to thank for helping me cut the video down and giving it the punch that it has. This part is hard to explain in anything but general terms, but really, you have to look at each clip and ask yourself what it adds to the piece, and is it really necessary.
Troubleshooting
The NEX-7 proved to be a formidable yet flexible camera, but it was not without issues. Aside from the unusable audio due to auto-gain, the camera’s AVCHD Progressive format did not play well with FCPX. I’m not sure which side of the transfer had the bigger issue, but the end result was that after hours of supposed importing and transcoding, the import would error. The footage would appear in the library, but when added to the timeline, it was actually referencing the files still on the card. FCPX would then error again when I went to export the video saying that it couldn’t do so while still referencing the card. It then wouldn’t let me change the reference, forcing me to re-import the video manually without moving the files or transcoding and then going shot-by-shot and replace clips with the new references. If I imported my D800 footage at the same time, the D800 footage would have the same error and problems. The only other way I found to fix this was to manually open up the MTS files on the card (a process that requires you to right-click a file on the card and clicking the option to view package contents. for some reason, Sony doesn’t want you to access the files directly), and transcode them through Adobe Media Encoder or other encoding software. This error was probably the most infuriating and time consuming error I ran into.
Another issue I ran into was with FCPX’s Ken Burns Effect. For whatever reason, the resulting video has two issues that cannot be removed within the effect settings. The first is that the speed of the move ramps at the beginning and end. While preferable for some shots, it’s really distracting for others. The only way I found to fix this issue is to either zoom and pan manually with keyframes, or to make a compound clip and trim the first two and last two frames from the main timeline, effectively removing the ramped portions. The other issue was that the effect frequently introduced momentary, flickering, light-colored lines along the edge of the video. I’m guessing this is due to the crop falling between pixels, resulting in a semi-transparent pixel or light colored pixel instead of a solid one. The best fix I’ve found for this is setting the size to be 100.5% so the image bleeds off the edge a little. It doesn’t seem to degrade the image, but it’s still annoying.
Equipment [top]
Cameras
Nikon D800
Nikon D700 (stills only)
Sony NEX-7
GoPro Hero2 (one shot only)
Lenses
Nikon 10.5mm fisheye
Nikon 16-35mm f/4 VR
Nikon 24mm f/1.4
Nikon 45mm f/2.8 PC-E
Nikon 85mm f/1.4
Nikon 70-200mm f/2.8
Nikon TC-20E III
Nikon 24-70mm f/2.8 (brought but not used)
Nikon 50mm f/1.4 (brought but not used)
Nikon 135mm f/2 DC (brought but not used)
Sony 18-55mm f/3.5-5.6 OSS
Sony 50mm f/1.8 OSS
Nikon F-mount to Sony E-mount adapter with aperture control
Flash Equipment
Nikon SB-900
PocketWizard MiniTT1 (brought but not used)
PocketWizard FlexTT5 x2
Sound
Rhode VideoMic Pro
Sony wireless lavalier mic/transmitter/receiver
Zoom H4n (brought but not used)
Support equipment
Tiffen Steadicam Merlin 2
Tiffen Vest and Arm upgrade kit for Merlin and Pilot
Gitzo GT2540LLVL Leveling 6X Carbon Fiber Tripod Legs
Manfrotto Super Clamp x2
SLIK ball head
Manfrotto 128RC QR micro fluid head
Manfrotto 200PL quick release plate adapter
BlackRapid 200PL quick release plate adapter
BlackRapid RS-Sport camera strap
BlackRapid RS-DR1 camera strap
Computer
2009 Macbook Pro 17″
Software
Adobe Bridge CS6
Adobe Photoshop CS6
Adobe AfterEffects CS6
Apple FinalCut Pro X
Apple Logic Pro 9
East West/Quantum Leap Sound Libraries
– Composer’s Collection
– Ra
– StormDrum 2 Pro
– Gypsy
Equipment used by shot/timecode [top]
| Timecode | Camera | Lens | Support | Details |
| 00:00.00 | D800 | 16-35mm @16mm | Steadicam handheld | Balance almost directly on gimbal |
| 00:06.13 | D800 | 24mm | Steadicam arm/vest | Aircraft in-flight |
| 00:12.07 | D800 | 24mm | Steadicam arm/vest | Post process stabilization |
| 00:16.08 | D800 | 24mm | Steadicam arm/vest | Post process stabilization |
| 00:19.12 | D800 | 24mm | Steadicam arm/vest | |
| 00:22.23 | D800 | 85mm | Steadicam arm/vest | on the ground |
| 00:26.04 | D800 | 24mm | Steadicam arm/vest | |
| 00:29.10 | D800 | 24mm | Steadicam arm/vest | |
| 00:32.16 | D800 | 24mm | Steadicam handheld | Adobe AfterEffects CS6 3D tracking with lighting for title |
| 00:37.14 | D800 | 24mm | Stills | Ken Burns Effect in FCPX |
| 00:39.06 | D800 | 24mm | Steadicam arm/vest | Post process stabilization |
| 00:42.14 | D800 | 24mm | Steadicam arm/vest | Post process stabilization |
| 00:45.18 | D800 | 24mm | Steadicam arm/vest | Post process stabilization |
| 00:49.00 | NEX-7 | 50mm | Clamp | Post process crop/pan |
| 00:52.06 | NEX-7 | 50mm | Tripod | Audio synced from D800/Lavalier mic |
| 00:55.05 | n/a | n/a | n/a | Material from MSgt Leslie, Ken Burns Effect in FCPX |
| 01:35.06 | D800 | 24mm | Tripod | Lavalier mic |
| 01:38.13 | n/a | n/a | n/a | Material from historian, Ken Burns Effect in FCPX |
| 02:00.13 | D800 | 24mm | Tripod | Lavalier mic |
| 02:02.14 | NEX-7 | 50mm | Clamp on Tripod | Audio synced from D800, Multicam clip editing in FCPX |
| 02:04.23 | D800 | 24mm | Steadicam handheld | |
| 02:07.20 | D800 | 24mm | Steadicam handheld | Post process stabilization |
| 02:13.15 | D800 | 24mm | Steadicam handheld | Lavalier mic |
| 02:16.00 | D800 | 85mm | Steadicam arm/vest | Post process stabilization |
| 02:20.10 | D800 | 85mm | Steadicam arm/vest | |
| 02:23.00 | D800 | 24mm | Steadicam handheld | |
| 02:28.00 | NEX-7 | 50mm | Clamp on Tripod | Audio synced from D800 |
| 02:30.22 | D800 | 70-200mm @200mm | Still | Ken Burns Effect in FCPX |
| 02:33.22 | D800 | 16-35mm @16mm | Steadicam handheld | |
| 02:37.05 | D800 | 70-200mm @200mm | Still | Ken Burns Effect in FCPX, radio chatter edited from lavalier mic in headset |
| 02:40.10 | D800 | 24mm | Steadicam handheld | Lavalier mic |
| 02:41.09 | D800 | 16-35mm @20mm | Clamp | |
| 02:43.07 | D800 | 24mm | Steadicam arm/vest | |
| 02:44.23 | D800 | 16-35mm @16mm | Clamp | |
| 02:46.04 | D800 | 16-35mm @16mm | Clamp | |
| 02:47.18 | D800 | 24mm | Steadicam arm/vest | |
| 02:49.19 | GoPro | Wide | Clamp | Camera flash for a still photo, I’m to the left of the loadmaster |
| 02:53.07 | NEX-7 | 10.5mm fisheye | Clamp upside-down | Video rotated and perspective adjusted in post, shot at 60fps and slowed to 24fps in post |
| 02:58.02 | NEX-7 | 10.5mm fisheye | Clamp | Post process stabilization & rolling shutter reduction, shot at 60fps and slowed to 24fps in post |
| 03:04.18 | D800 | 70-200mm @105mm | Steadicam arm/vest | |
| 03:10.15 | D800 | 24mm | Steadicam arm/vest | |
| 03:14.08 | n/a | n/a | n/a | Material from MSgt Leslie, Ken Burns Effect in FCPX |
[top]