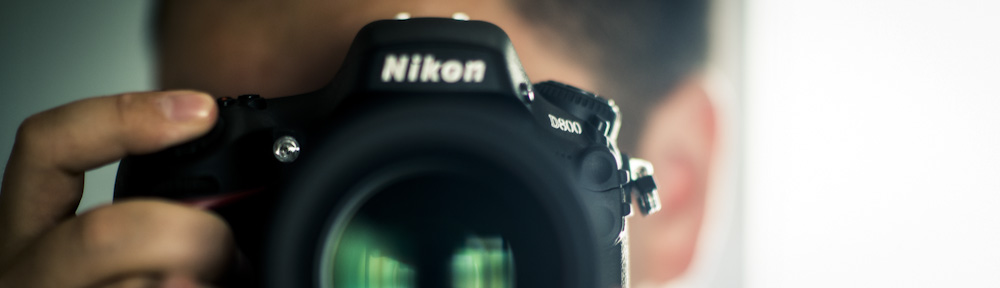

Sony α7R. Photo taken with a Nikon D800 and 45mm PC-E lens. © 2014 Samuel Morse
I received my Sony α7R in the mail a little over a week ago. While I haven’t used it as extensively as I would have liked, I do think I’ve delved deep enough to offer some honest opinions on its functionality. Now, there are plenty of places like DPreview where you can get the full low-down on the specs and features, so I’m going to focus specifically on my own revelations about its functionality.
There was a reviewer who compared the α7R to the original iPhone. I think this thought is spot-on. This camera is ground-breaking and a beautiful glimpse into what the camera industry has in store for us in the future. However, it still has some serious flaws that are just enough that I don’t see this camera getting the mainstream usage future iterations might see. Still, the fact that Sony managed to cram a 36 megapixel full frame (35mm format) sensor into a mirrorless interchangeable lens camera is impressive. This means the camera is capable of image quality to rival my Nikon D800.
Let’s get started.
Quick links:
Size Comparison
Controls/Handling
Speed
Shutter Noise
Battery Life and Charging
Video
Wireless Functions
Zeiss 55mm FE Lens
Lensbaby Tilt Transformer
Overall Impression and Comparisons
Also, why I am shooting Sony more (separate blog)
Size Comparison top^
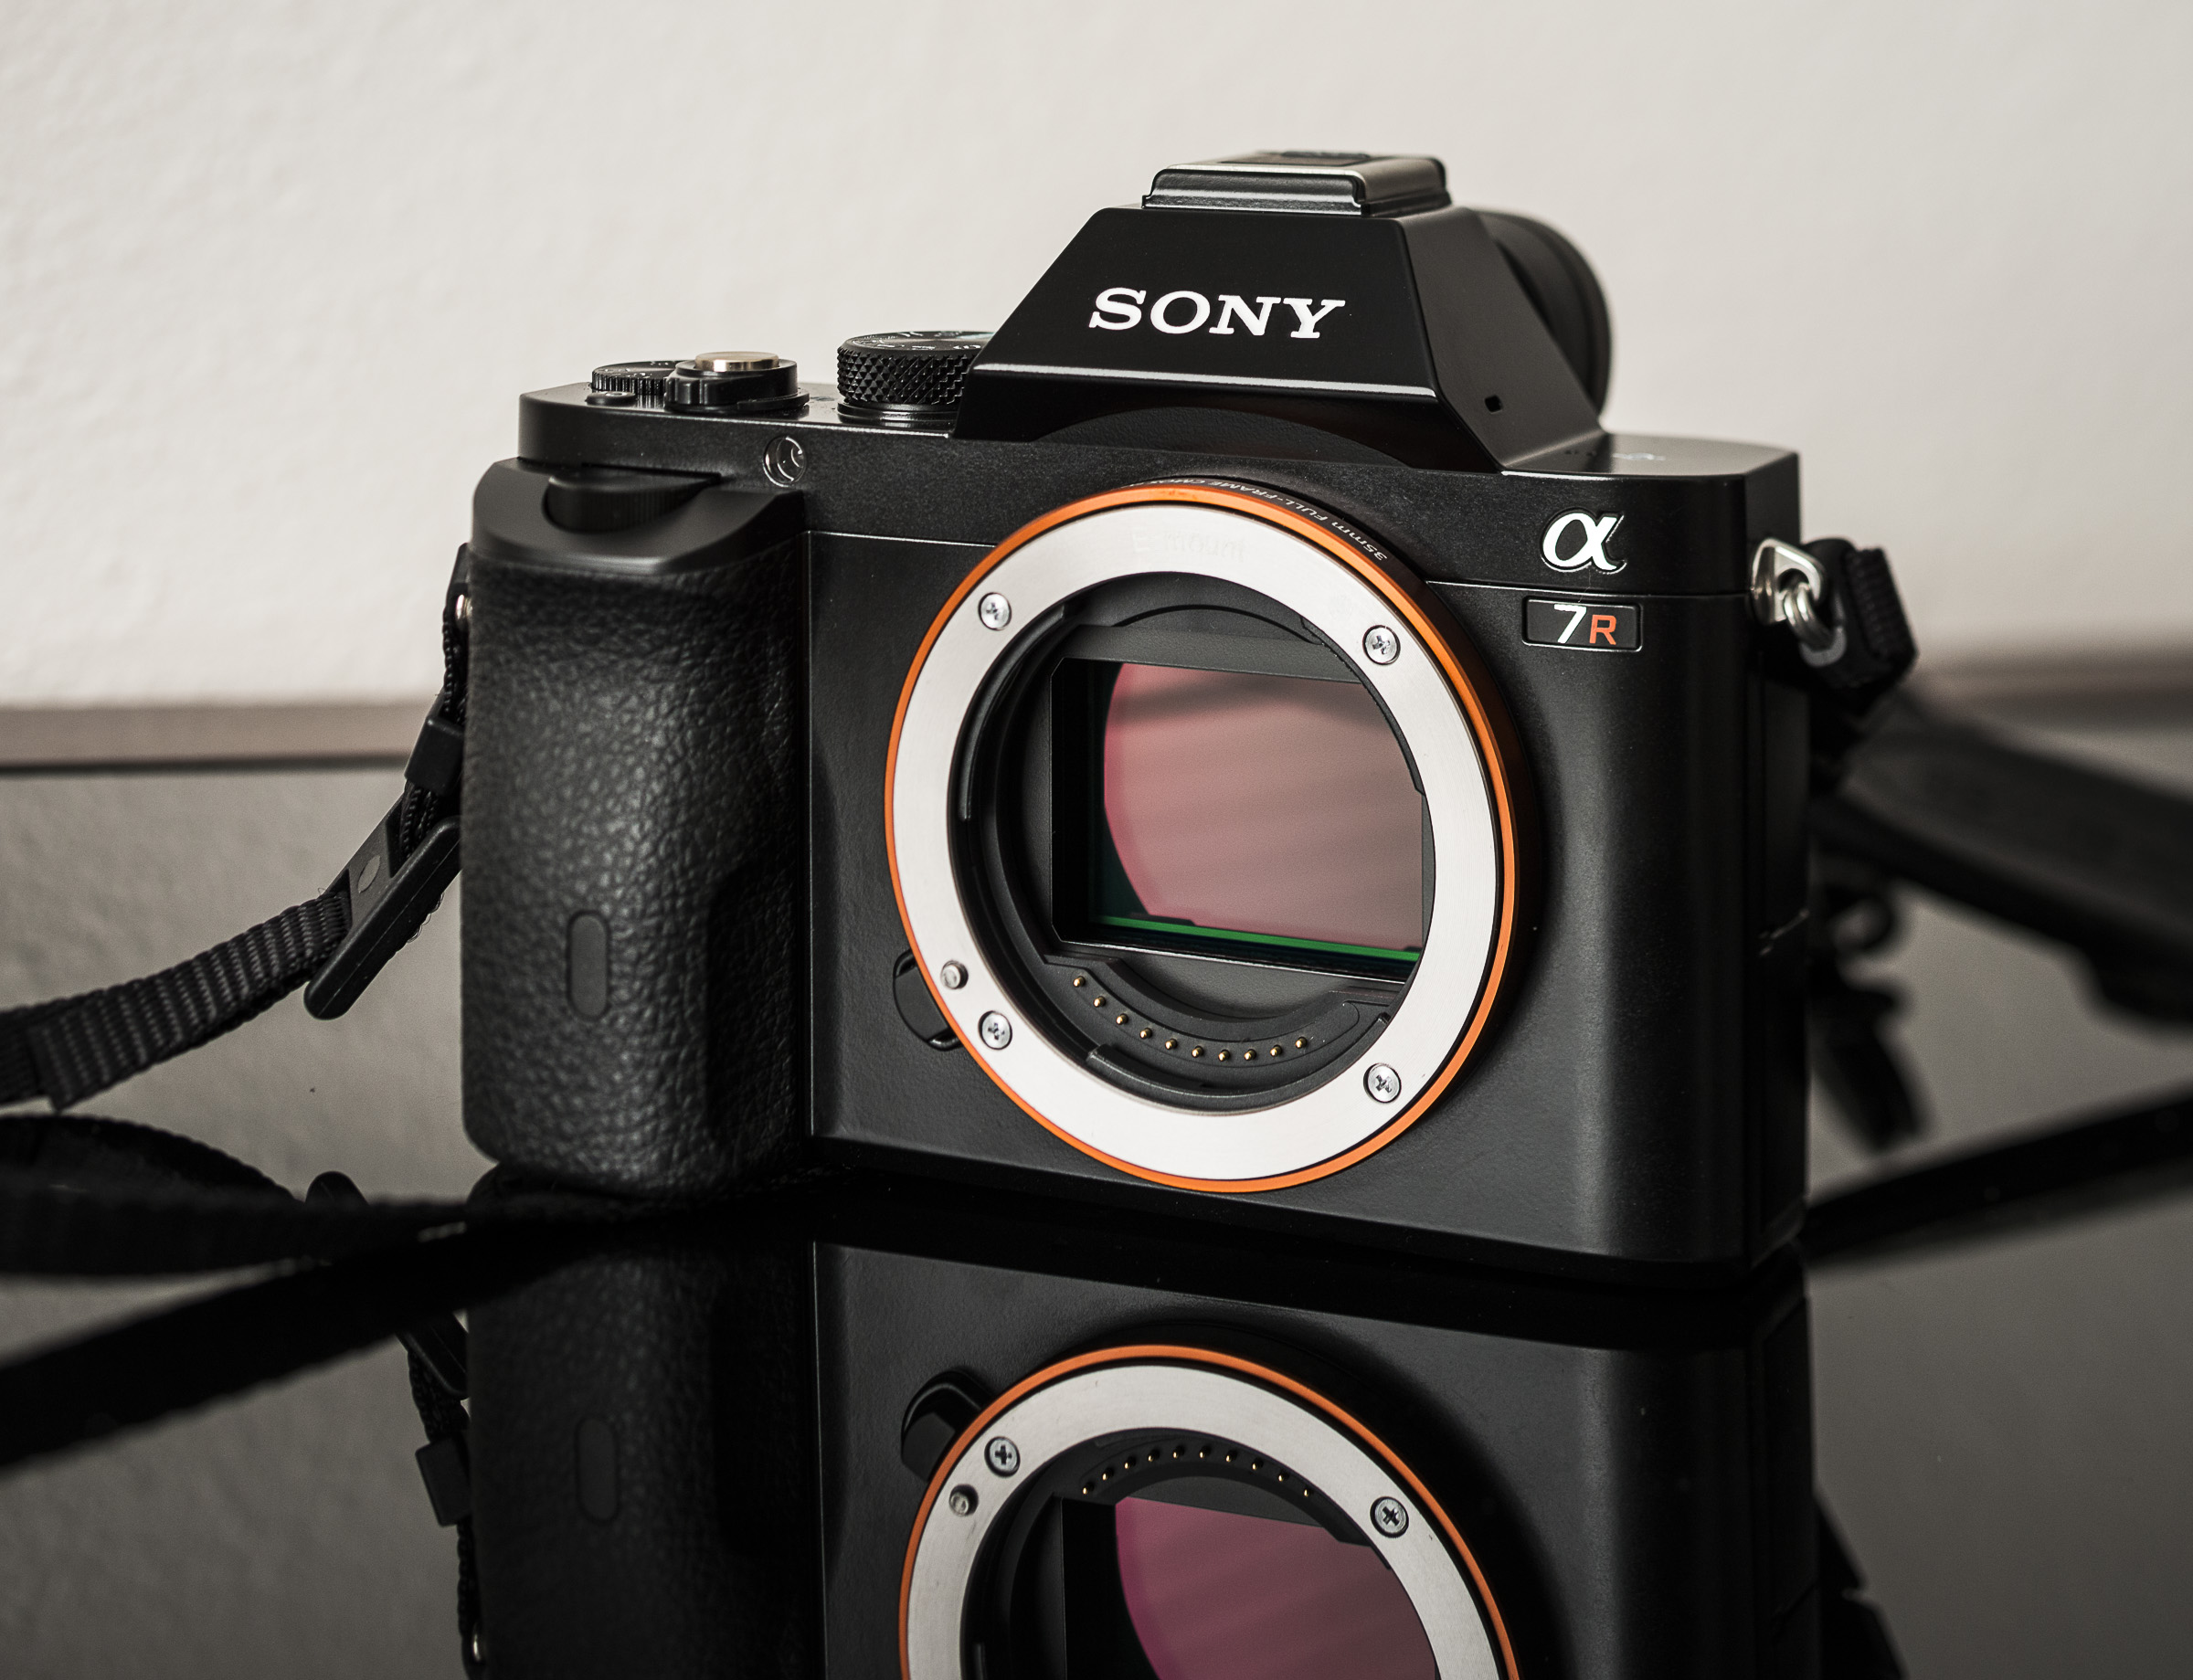
Sony α7R with no lens attached. That’s a massive 36-megapixel 35mm sensor. Photo taken with a Nikon D800 and 45mm PC-E lens. © 2014 Samuel Morse
Before we really get into the size comparisons, I want to make sure it’s clear why these size comparisons are important. The Sony α7R has a 36-megapixel, 35mm format (full frame) sensor. This is basically the same sensor that’s in the Nikon D800E. On top of that, it has interchangeable lenses. Nobody, I repeat nobody, has managed to put a sensor this size in an interchangeable lens camera this small. It simply hasn’t been done.
Take a look on DxOMark for the low-down on just how amazing this sensor is.
Anyway, here are the comparisons.
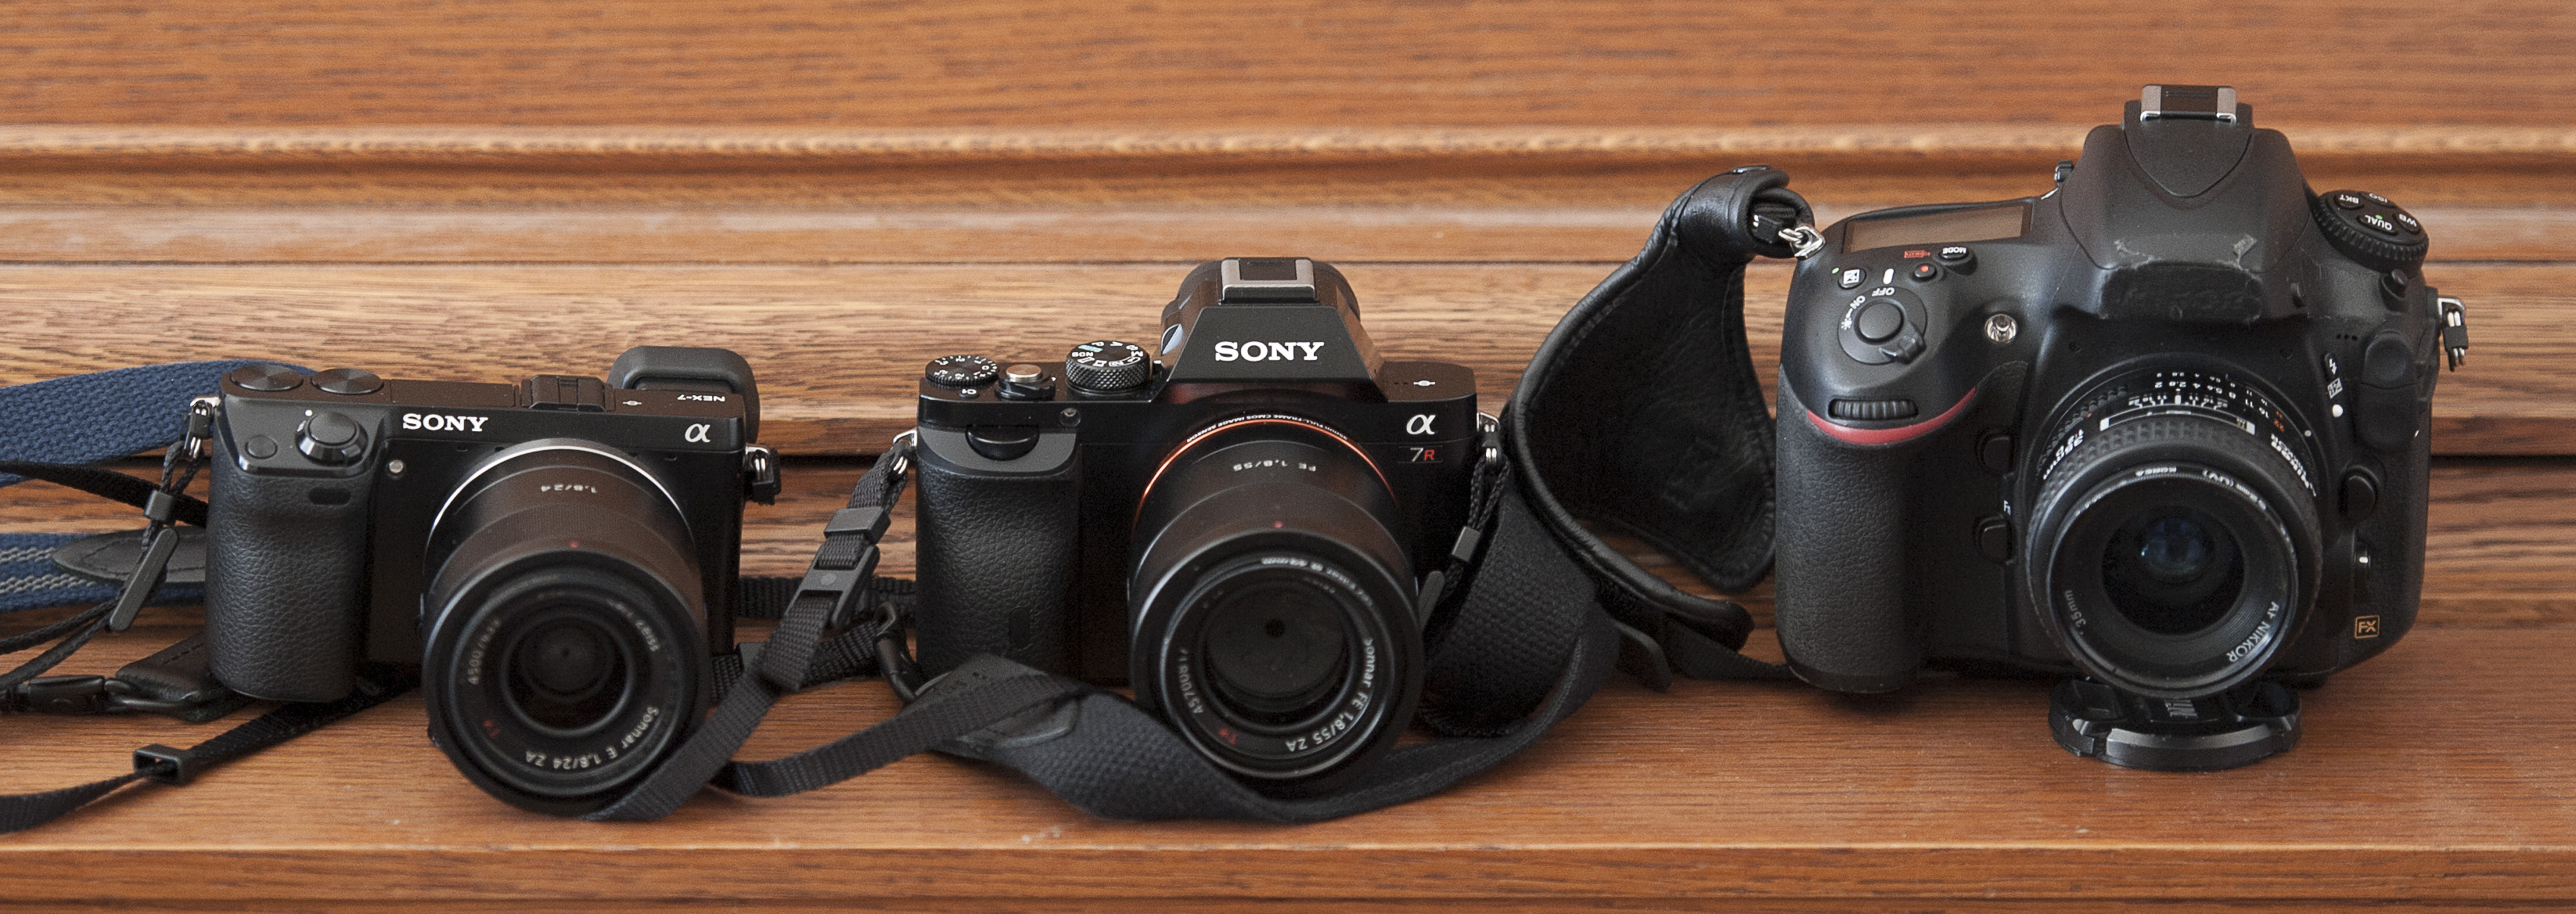
Size comparison: From the left, Sony NEX-7 with Zeiss 24mm f/1.8, Sony α7R with Zeiss 55mm f/1.8, Nikon D800 with Nikon 35mm f/2. photo taken with a Nikon D700 © 2014 Samuel Morse
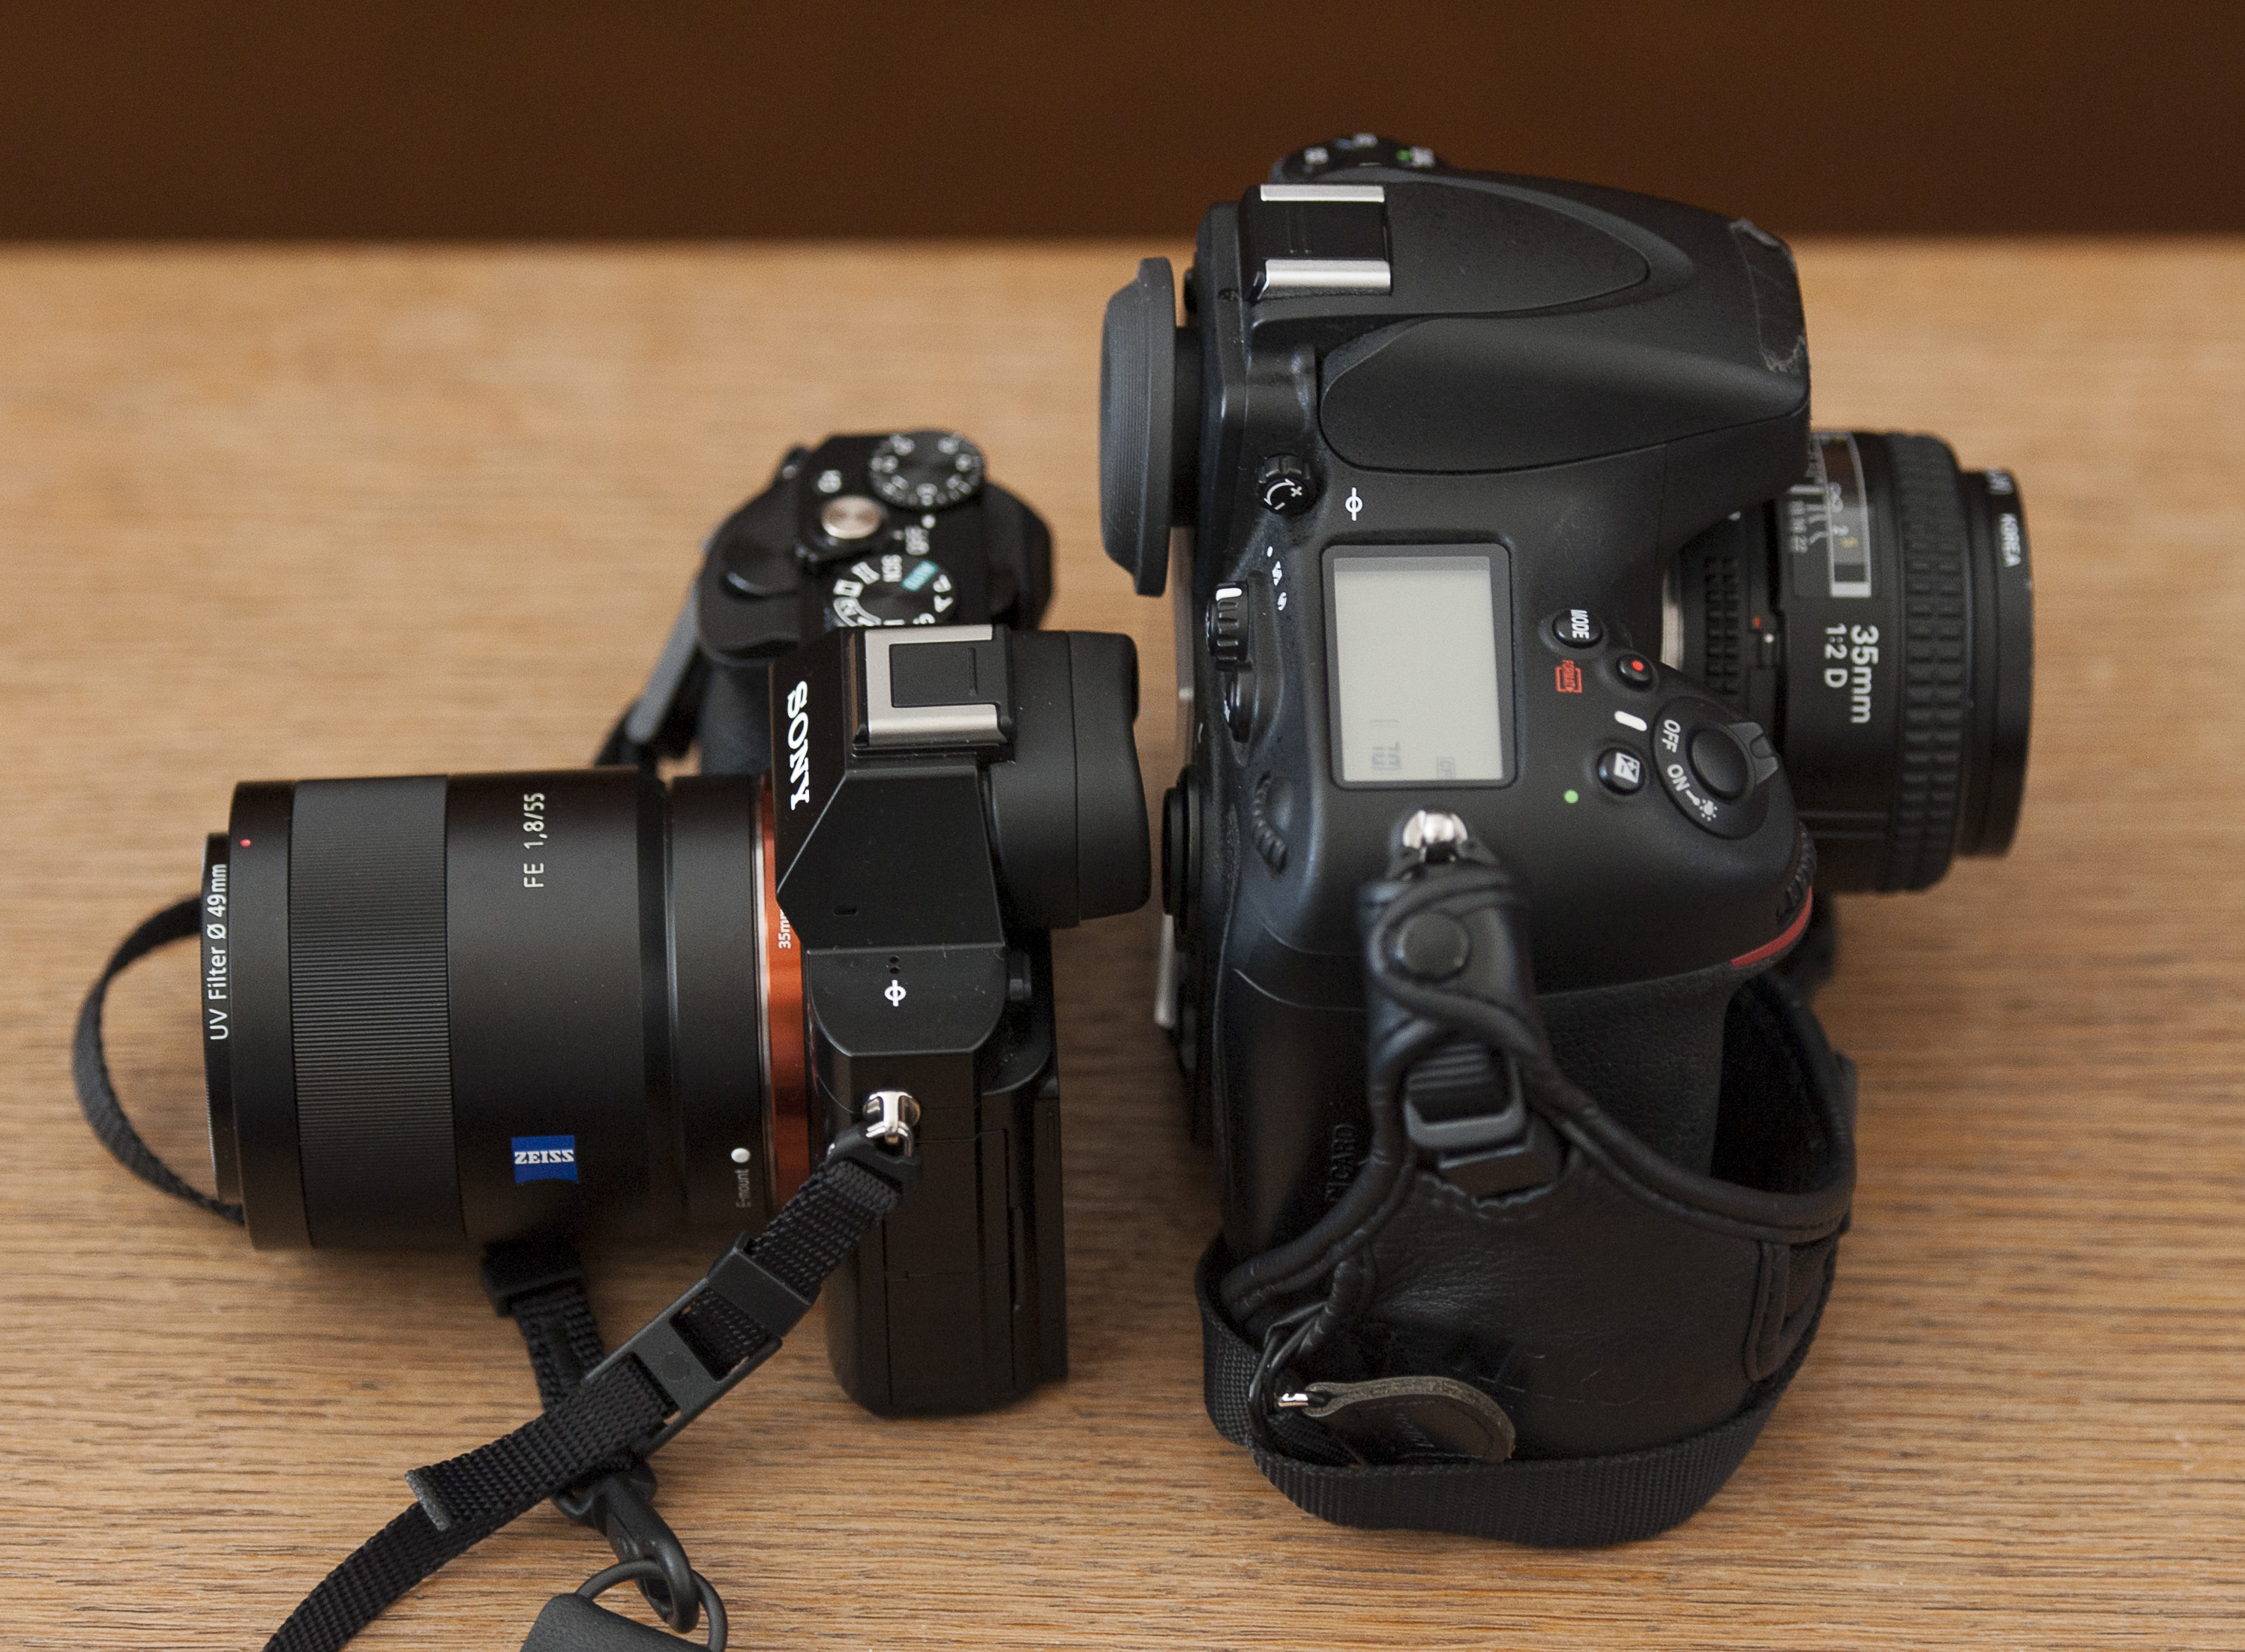
Camera depth comparison. On the left, Sony α7R with Zeiss 55mm f/1.8, Nikon D800 with Nikon 35mm f/2 on the right. Note that while the bulk is much greater on the D800, the depth of the lens is pretty close to the same on both cameras, likely due to what it takes to properly project light onto a digital sensor. photo taken with a Nikon D700 © 2014 Samuel Morse
What you can’t see from the photos is the weight. The Sony α7R is built pretty solidly and has a nice heft in your hands. However, it’s still surprisingly light in actual use. The body is a mere 400g, and the lens another 300g. To put things into perspective, the D800 is 900g, and most lenses I use with that camera are 600g or more. When you consider that both cameras have pretty much equal image quality, I can already tell which camera is going to be on my shoulder more than the other.
Controls/Handling top^
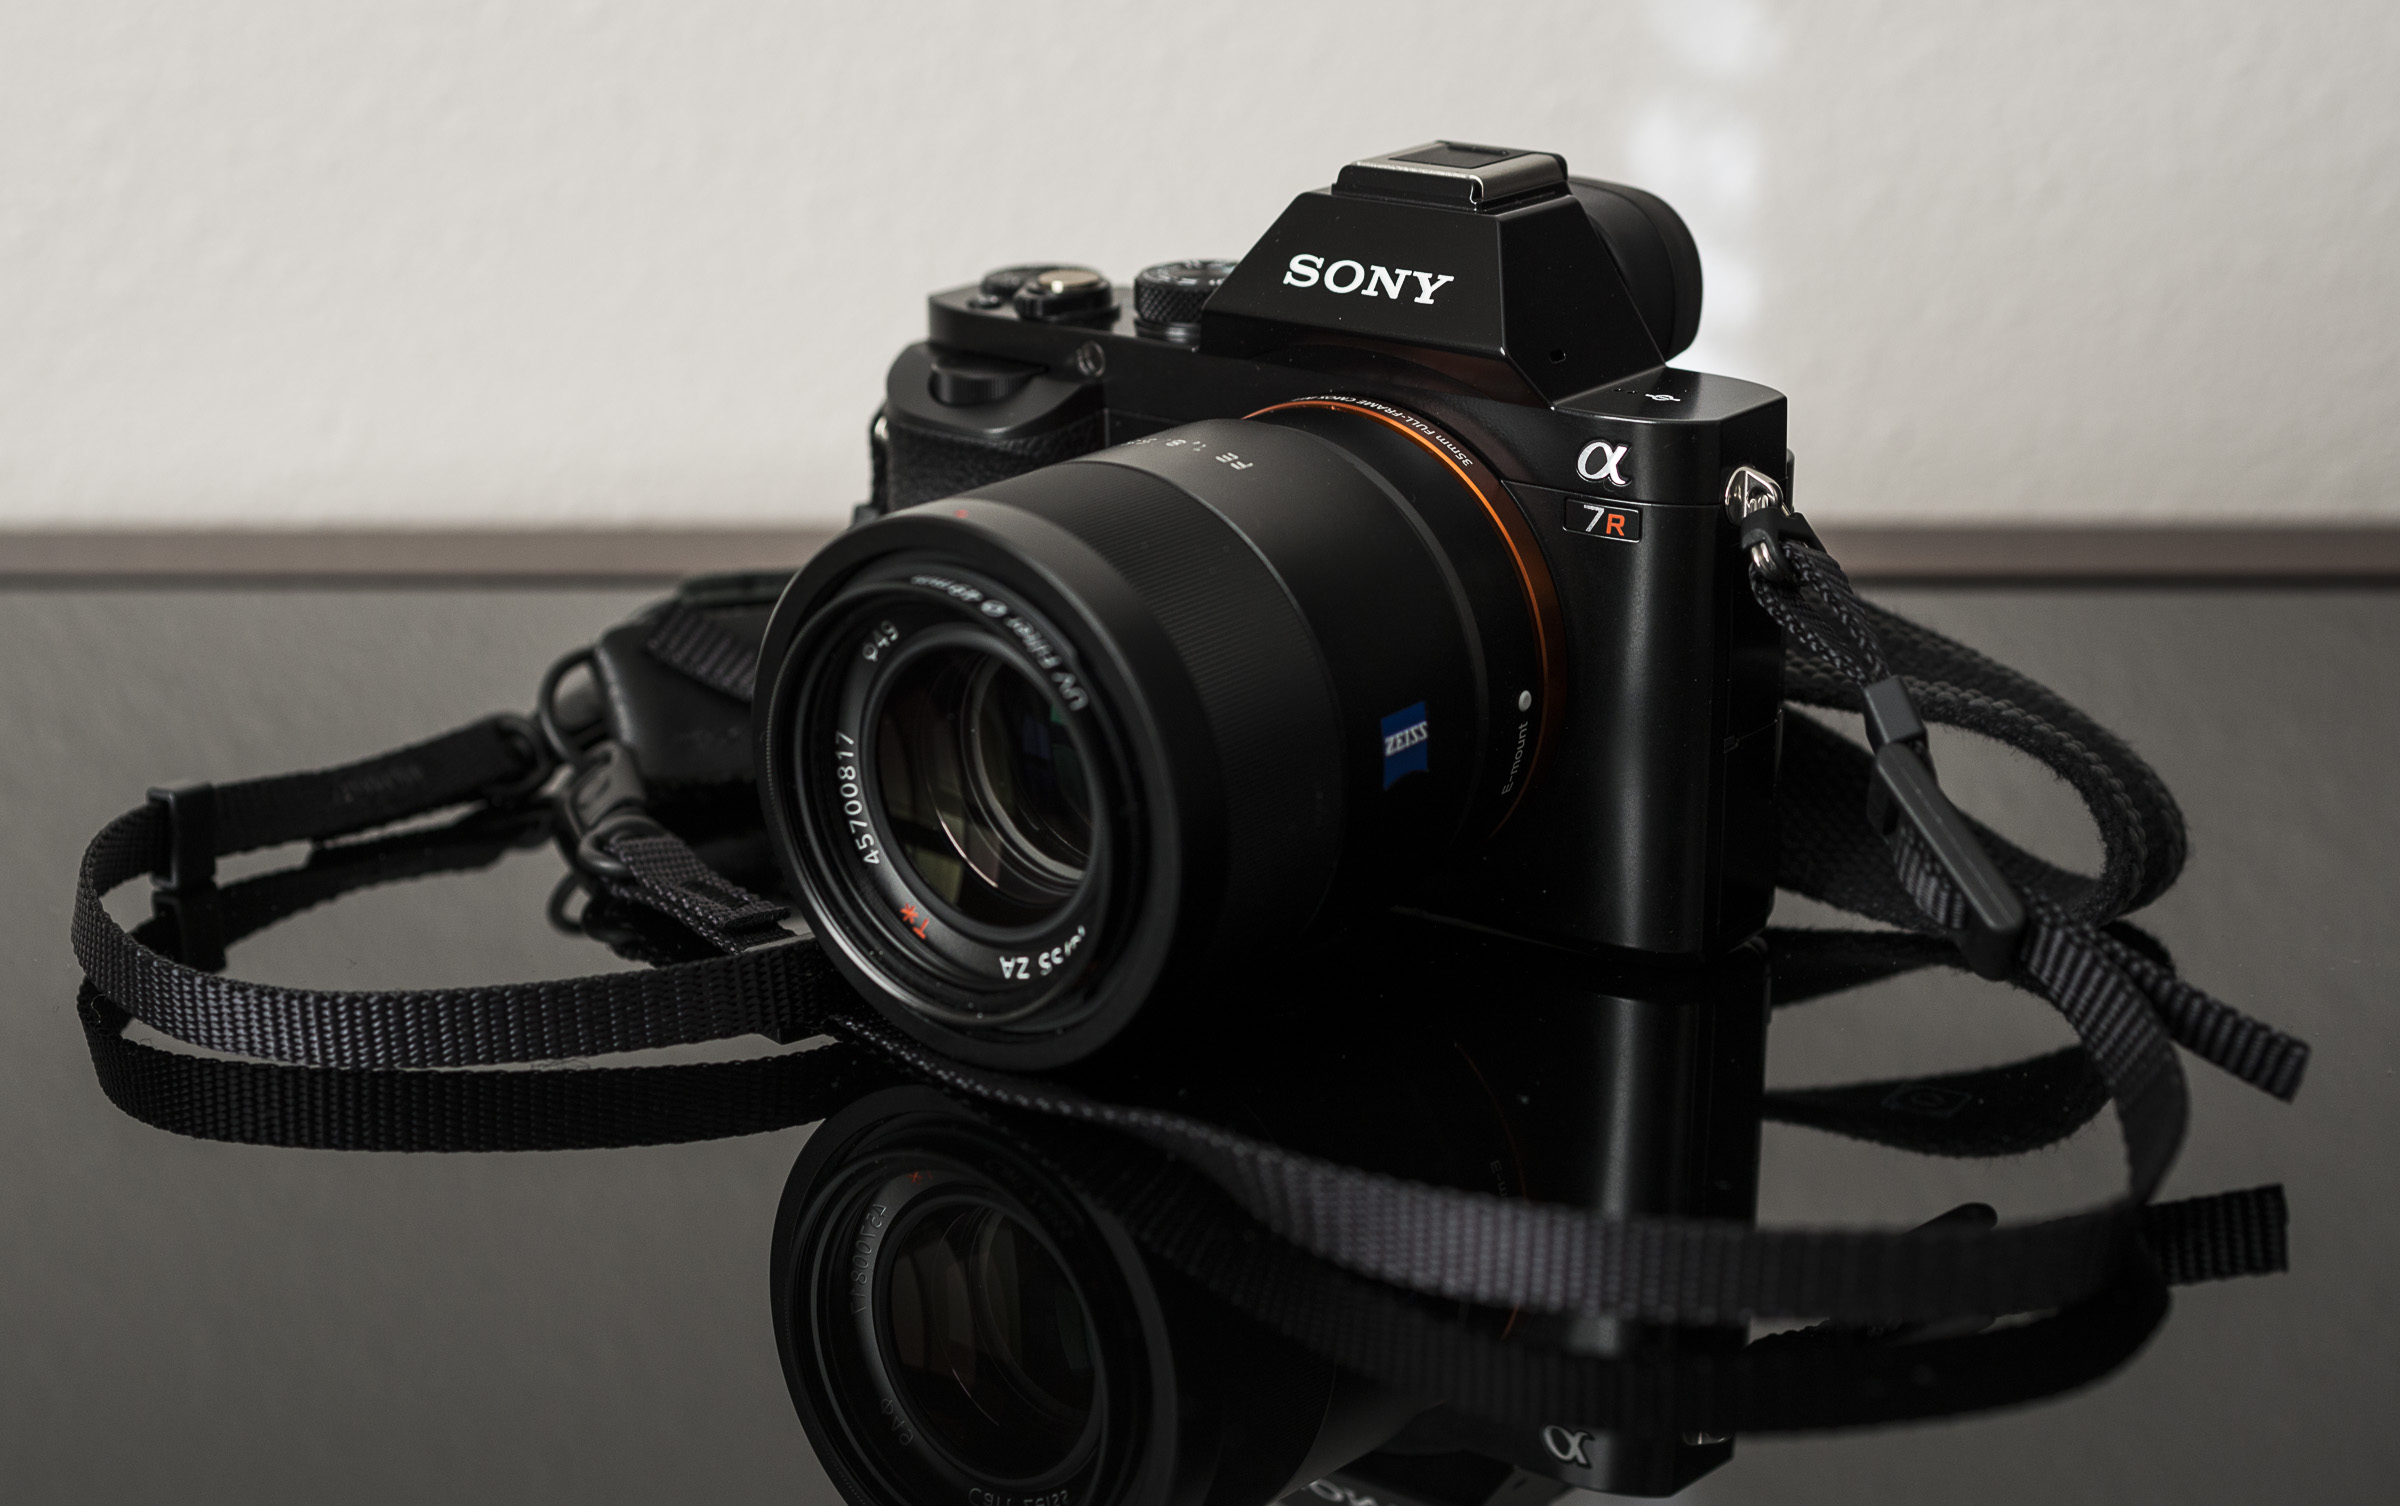
Front view of the Sony α7R. Photo taken with a Nikon D800 and 45mm PC-E lens. © 2014 Samuel Morse

Rear view of the Sony α7R controls. Photo taken with a Nikon D800 and 45mm PC-E lens. © 2014 Samuel Morse
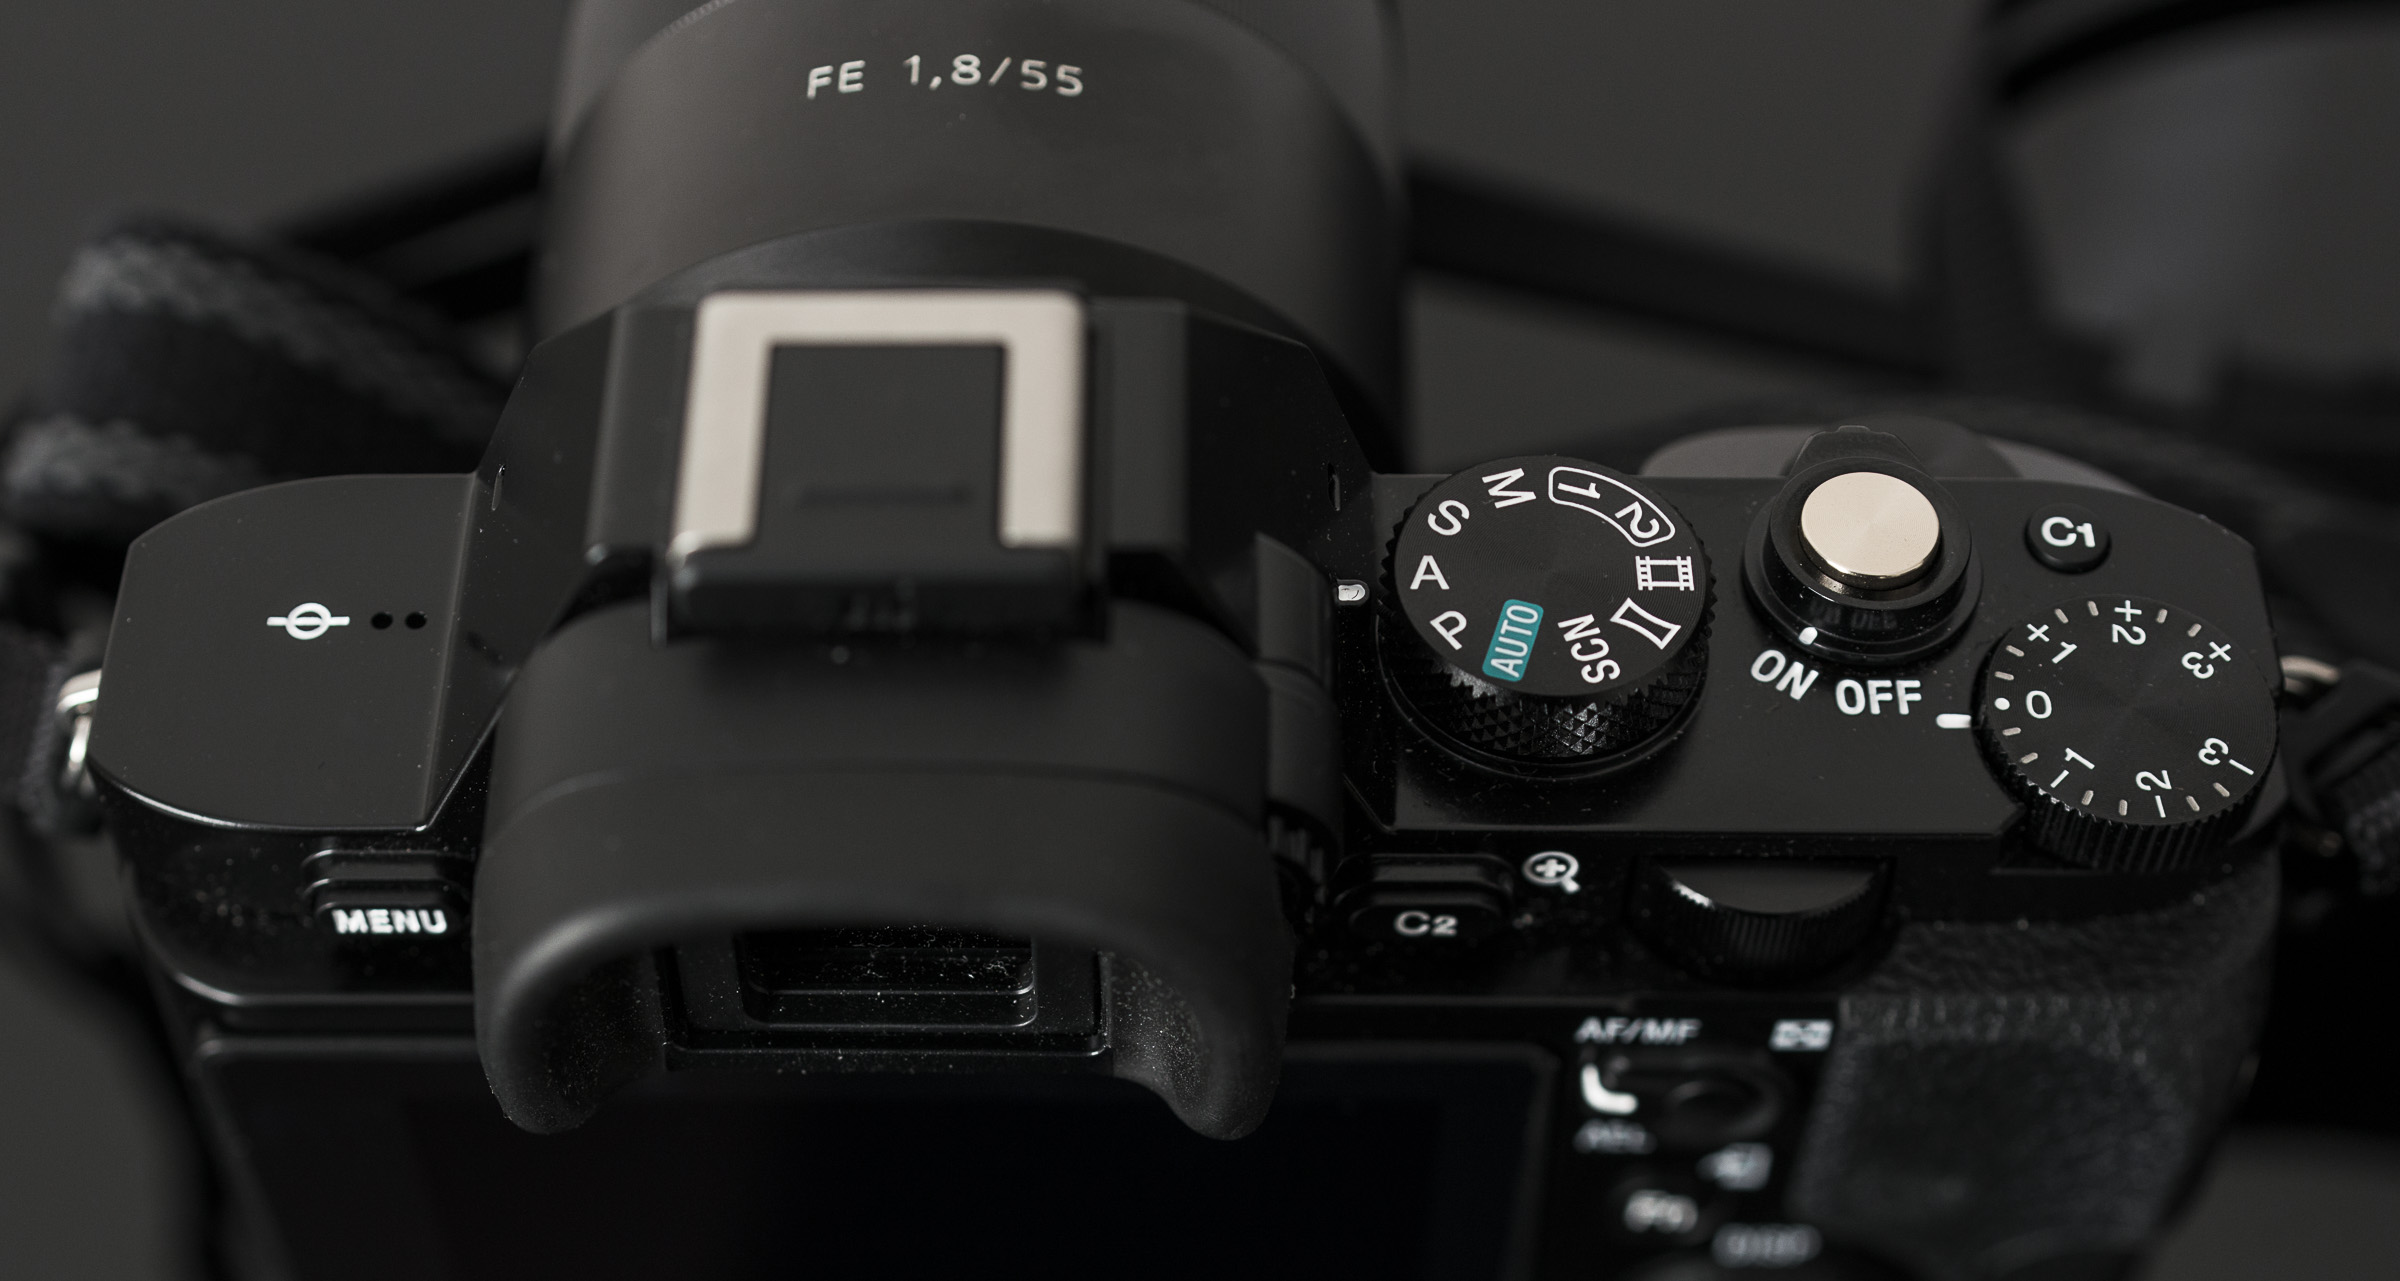
Top view of the Sony α7R controls. Photo taken with a Nikon D800 and 45mm PC-E lens. © 2014 Samuel Morse
For the most part, I’d say the controls are neutral to good. In all but one area, they are an improvement over the NEX-7. The additional customizable buttons and the Fn button make a world of difference in how fast and easy it is to change settings on the fly. Still, I have two major gripes about the controls:
1. It still takes more than one button press to move the AF point. This is where I REALLY miss my Nikon, because all I have to do is move the D pad on the back to move the AF point. No extra button to enable this, and definitely not two extra button presses. That said, the face recognition AF is reasonably good, and for everything else, I have the camera set-up to default to manual focus, with a button designated to engage the center AF point only when I want it to, basically separating the AF function from the main shutter release. This is definitely a “fix” that I have to explain to anyone else using my camera, but it works fairly well for the typical focus-and-recompose methodology.
2. Zooming in and out of images is harder than with the NEX-7. I really liked the way you could press the center button of the rear center dial to engage the image zoom, and then simply spin the dial to zoom in and out. On the α7R, you have a zoom in and out button, and it defaults to zoom all the way in, rather than the last-used zoom level. On top of that, the zoom in/out buttons are placed far away from the other navigation buttons to the point of being uncomfortable to reach and I haven’t figured out a way to change that yet.
The handling is also pretty good, although I’d say slightly worse than the NEX-7. Most of the dials and buttons are pretty easy to get to, although the shutter release is slightly back from where it feels comfortable. I can tell they tried to go a little “retro” with the placement, but it came off as just uncomfortable. This is by no means a deal-breaker, just a minor annoyance, and even then only for a little while. The grip is also just a little awkward. My hand wraps around the NEX-7 like the two were made for each other. This isn’t quite the case for the α7R. I think this is because the grip is made with the optional vertical grip in mind. I find the most comfortable way to hold it leaves a major portion of my hand hanging off the bottom of the camera, right were the vertical grip would continue. It’s still better than a lot of other cameras, especially mirrorless compacts, but it could certainly be better.
The electronic viewfinder and tiltable display are a huge help. I can already tell that they will work marvelously for shooting video, especially since they are very similar to the already superb NEX-7. My biggest challenges with shooting video on my D800 were that I could never see the damn screen in bright sunlight, and it was difficult to compose for extra-high or low angles. This camera solves those issues marvelously. Now, I certainly wouldn’t have minded having a screen that flipped out to the side and all the way around so I could easily do webcasts, but this is still much better suited for getting good angles than other cameras. There’s also the external wireless monitoring via iOS/Android device, which I’ll cover later.
Battery Life and Charging top^
Something that really needs to be stated but I can figure out where to put it is the battery life and charging method. Sony, in their infinite wisdom, decided that it would be best to forgo the standard charger and make the α7R charge via USB. I’ll admit, there are some definite upsides to this. Because it’s a standard micro USB cable just like in Samsung smartphones and other devices, it’s really easy to find a place to charge the camera in a pinch. However, because the battery has to be charged in the camera, you essentially lose use of the camera, or are tethered to a power source while you shoot. This is even worse when you consider that the battery life is only half that of a camera like the Nikon D800, and a quarter the life of a camera like the Nikon D4. This means you need to charge multiple batteries, and the camera is tied up the entire time.
In short, Sony, you need to include a damn battery charger. Leave the USB option, but include a stand-alone charger.
Please.
Shutter Noise top^
Another thing I need to briefly address is the shutter noise. I’ve read and heard reviews slamming Sony for putting such a loud focal plane shutter in the α7R. Honestly, this doesn’t bother me nearly as much as I thought it would. Sure, it’s not all that stealthy, especially compared to cameras like the Sony RX1 with its leaf shutter. Then again, because it’s a little slower to ready itself, it’s not nearly as annoying as turning off the electronic front curtain shutter on the NEX-7. At least the α7R still sounds like it’s taking a single photo rather than two like the NEX-7. It’s also not nearly as loud as professional dSLRs, especially ones like the Nikon D700 and D3. It is what it is, but it really doesn’t bother me that much.
Speed top^
Probably the biggest drawback to this camera is the glacial pace at which it performs certain acts. It doesn’t help that I’m accustomed to my D800 which handles its 40MB RAW files like a champ. Not everything is slow, but the startup time, shutter lag, preview zoom, and image write speed, are enough to make me want to tear my hair out sometimes.
Startup time and shutter lag are probably a little less significant, but still worth going into detail with. For someone used to dSLRs that are only marginally slower than their film predecessors at starting up, the fact that the α7R starts up as fast as your average point-and-shoot can be a little alarming, especially when you are frequently turning it off and on to save battery life. I can’t say I’ve missed shots because of this, but I can see it happening. The other part is the shutter lag. Now, I’m not talking about the time from when you first start pressing the shutter release to when it takes the photo. Anyone interested in this camera should realize that kind of shutter lag is very preventable. I’m talking about the time from when you’re fully focused and metered to when the camera starts recording the image. The α7R does not have an electronic front curtain shutter. This means that the focal plane shutter has to fully close before it can reopen to take the photo. This momentary delay is hard to predict, and thusly, hard to time. It’s possible this just takes a little getting used to, but still worth noting.
As for the preview zoom and image write speed, these are as perplexing as they are frustrating. I’m using a SanDisk 64GB SD card with a read/write speed of 95MB/s. This should work well to handle the massive files generated by the 36mpx sensor. However, despite the slow frame rate of the camera, I noticed many times where I had to wait for the image to finish writing before I could preview it. These delays were momentary, but every second counts if you’re trying to shoot something quickly. This could be a situation where my familiarity with the D800 doesn’t help, seeing as how I use UMDA7 cards with a read/write speed of 150MB/s, but I still don’t see this making this much of a difference. Once the image is previewed, the performance can be pretty slow still. Scrolling through full-screen thumbnails is pretty fast, but once you try to zoom in, the whole process slows down, and heaven forbid you bump a command dial; the whole camera will freeze up for a moment while it loads the need full resolution preview, only to have to scroll back and wait for it to reload yet again.
Now, the speed of the camera is somewhat understandable. This is a small camera trying to run a powerhouse of a sensor on a small battery. I get that. A friend of mine as well as another reviewer said that using this camera is reminiscent of using a medium format camera. I’d say that’s true. Despite the smaller size, the camera handles almost exactly like the Hasselblad H3D we have at my office in terms of speed in which you can perform functions. It’s not a deal breaker for me, and can actually make you a better photographer, because you have to be perfect in your actions. Every missed step slows you down significantly, and it pays to really pay attention to what you’re doing. Am I making excuses? Maybe. The speed issue may be a deal-breaker for certain types of photography, but not for what I use this camera for.
Video top^
I haven’t been able to shoot much video yet, but from everything I can see, I’m very excited to shoot my next project with it.
As with the rest of this review, let’s start with the bad. The camera does not do 30p video (29.97 fps). I’m not sure why, but this will require me to pay attention more to whether I’m trying to fit this with other footage or not. Honestly, it’s not that big of a deal to me since I like the look of 24p better anyway, but still worth noting. Also, due to the small size, I’m not even going to try mounting this to my Steadicam; there’s just no point because it’s too light to be stable (Steadicams work using inertia, so the more mass, the more stable the camera is). This is made worse due to the fact that none of my compatible lenses have any sort of optical image stabilization. Lastly, as wishful thinking, I would be great if it shot 12-bit raw like the new BlackMagic Pocket Cinema Cam.
That said, everything else looks really good. The AVCHD codec is pretty good at delivering good quality at low bit rates. It does 60p video which I love using for slow motion effects. The full frame sensor will be great for shallow depth of field for that cinematic look, as well as a native ISO down to ISO 50 which will help with wide depth of field in bright conditions. It not only has audio level control (my biggest beef with the NEX-7), but even has a headphone jack for audio monitoring. Sony also fixed my other beef with using the NEX-7 for video, which is the strong rolling shutter, now more comparable to the Nikon D800 and Canon 5DmIII. The dedicated video mode on the dial helps with really setting yourself up right for video shooting. Also, while the small size is terrible for Steadicam work, it will be great for shooting from tight areas and maybe eventual use in a drone aircraft or other similar application. The uncompressed HDMI output will help if I ever decide to pick up an external recorder, especially since that will allow me to record unlimited lengths. This is possibly my most capable video camera right now, with the one exception being the lower battery life.
For more info on the video capabilities. Phillip Bloom just released an extensive review of the α7R as part of a multi-item review with the α7 and RX10. Check it out at http://philipbloom.net/2014/01/06/a7r/.
Wireless Functions top^
The α7R has both WIFI and NFC technology built-in. I can’t test out the NFC functions because I don’t have any other devices that support it. However, the WIFI works with my iPhone….. sort of.
I can tell that the wireless functions are designed to be intuitive, but they really aren’t. You have to go into the menu settings, select an oddly labeled menu, select applications, and then you can access those functions. There is at least one shortcut, but I haven’t been able to make this reliably work just yet.
Then there’s compatibility. Not all functions are compatible with all devices, and there’s no good way of checking whether you did something wrong or if your phone’s just not compatible. For instance, I can get the wireless monitoring to work, but not wireless sharing. Sony’s documentation on this only goes over the basics, which obviously isn’t enough.
Once the camera and phone are linked up through the Sony PlayMemories app for iOS/Android, it’s a little better. The wireless monitoring function actually works really well, and is very reminiscent of the GoPro Hero3+ I have in terms of feed delay and functionality. That’s both a good thing and a bad thing. The interface makes it pretty easy to take a photo and focus, but if you want to adjust anything more than that, you have to adjust it on the camera. It defaults to the most automatic settings the camera is capable of, which basically makes it a glorified point and shoot. Still, the function works and downloads the image direct to your phone for sharing. Here are two examples.

Taken with the Sony α7R remotely using the Sony PlayMemories app on an iPhone 5 and edited using Camera+ for iOS (that’s me by the way). the lens was a Zeiss 55mm f/1.8

Taken with the Sony α7R remotely using the Sony PlayMemories app on an iPhone 5 and edited using Camera+ for iOS. The lens was a Nikon 35mm f/2 using a Lensbaby Tilt-Converter
I can definitely see this feature useful, and is honestly one of the big reasons I purchased the camera. It’s particularly good for photojournalists and public affairs folks because it allows you to get dSLR quality photos and upload them to the web from the field or email them back to a home office. In today’s 24-hour news cycle, not having to go back to your office to upload could mean the difference between getting the story or getting the boot.
The Zeiss 55mm f/1.8 FE lens top^
I’m sitting here thinking about what to say about the Zeiss 55mm FE lens. Truthfully, I would have loved it if Sony put image stabilization into the lens, but that can be remedied with camera stabilizers. It would also be great if the aperture was wider, but that would have made the lens even larger and heavier than it already is, defeating the purpose of a compact system. I also wish the minimum focusing distance was closer, but it’s pretty comparable to other “thrifty fifty” lenses.
That said, this lens is an optical marvel. The truest testament to this lens is the fact that even though it’s mounted on a 36-megapixel camera with no anti-aliasing filter, I don’t generally feel compelled to close the aperture down. Sure, it sharpens up just a little more as you close down, but it’s still damn sharp at its maximum aperture of f/1.8. Compared to my Nikon 24mm f/1.4 and 85mm f/1.4, I’d argue its significantly sharper at f/1.8. On my D800, I always felt I needed to close down to f/2 to get an acceptably sharp image due to the same sort of 36-megapixel sensor. This Zeiss lens performs more like the new Sigma 35mm f/1.4 Art series lens, or maybe even a Leica lens. Really, it’s that good. Sure, there’s some chromatic aberration, but it’s really well controlled for such a wide aperture lens.
Here are some samples:

Sharpness/bokeh test. f/1.8, 1/5000 sec, ISO 100. The in-focus stalks are perfectly sharp. © 2013 Samuel Morse

Christmas Tree bokeh test. f/1.8, 1/80 sec, ISO 800 © 2013 Samuel Morse
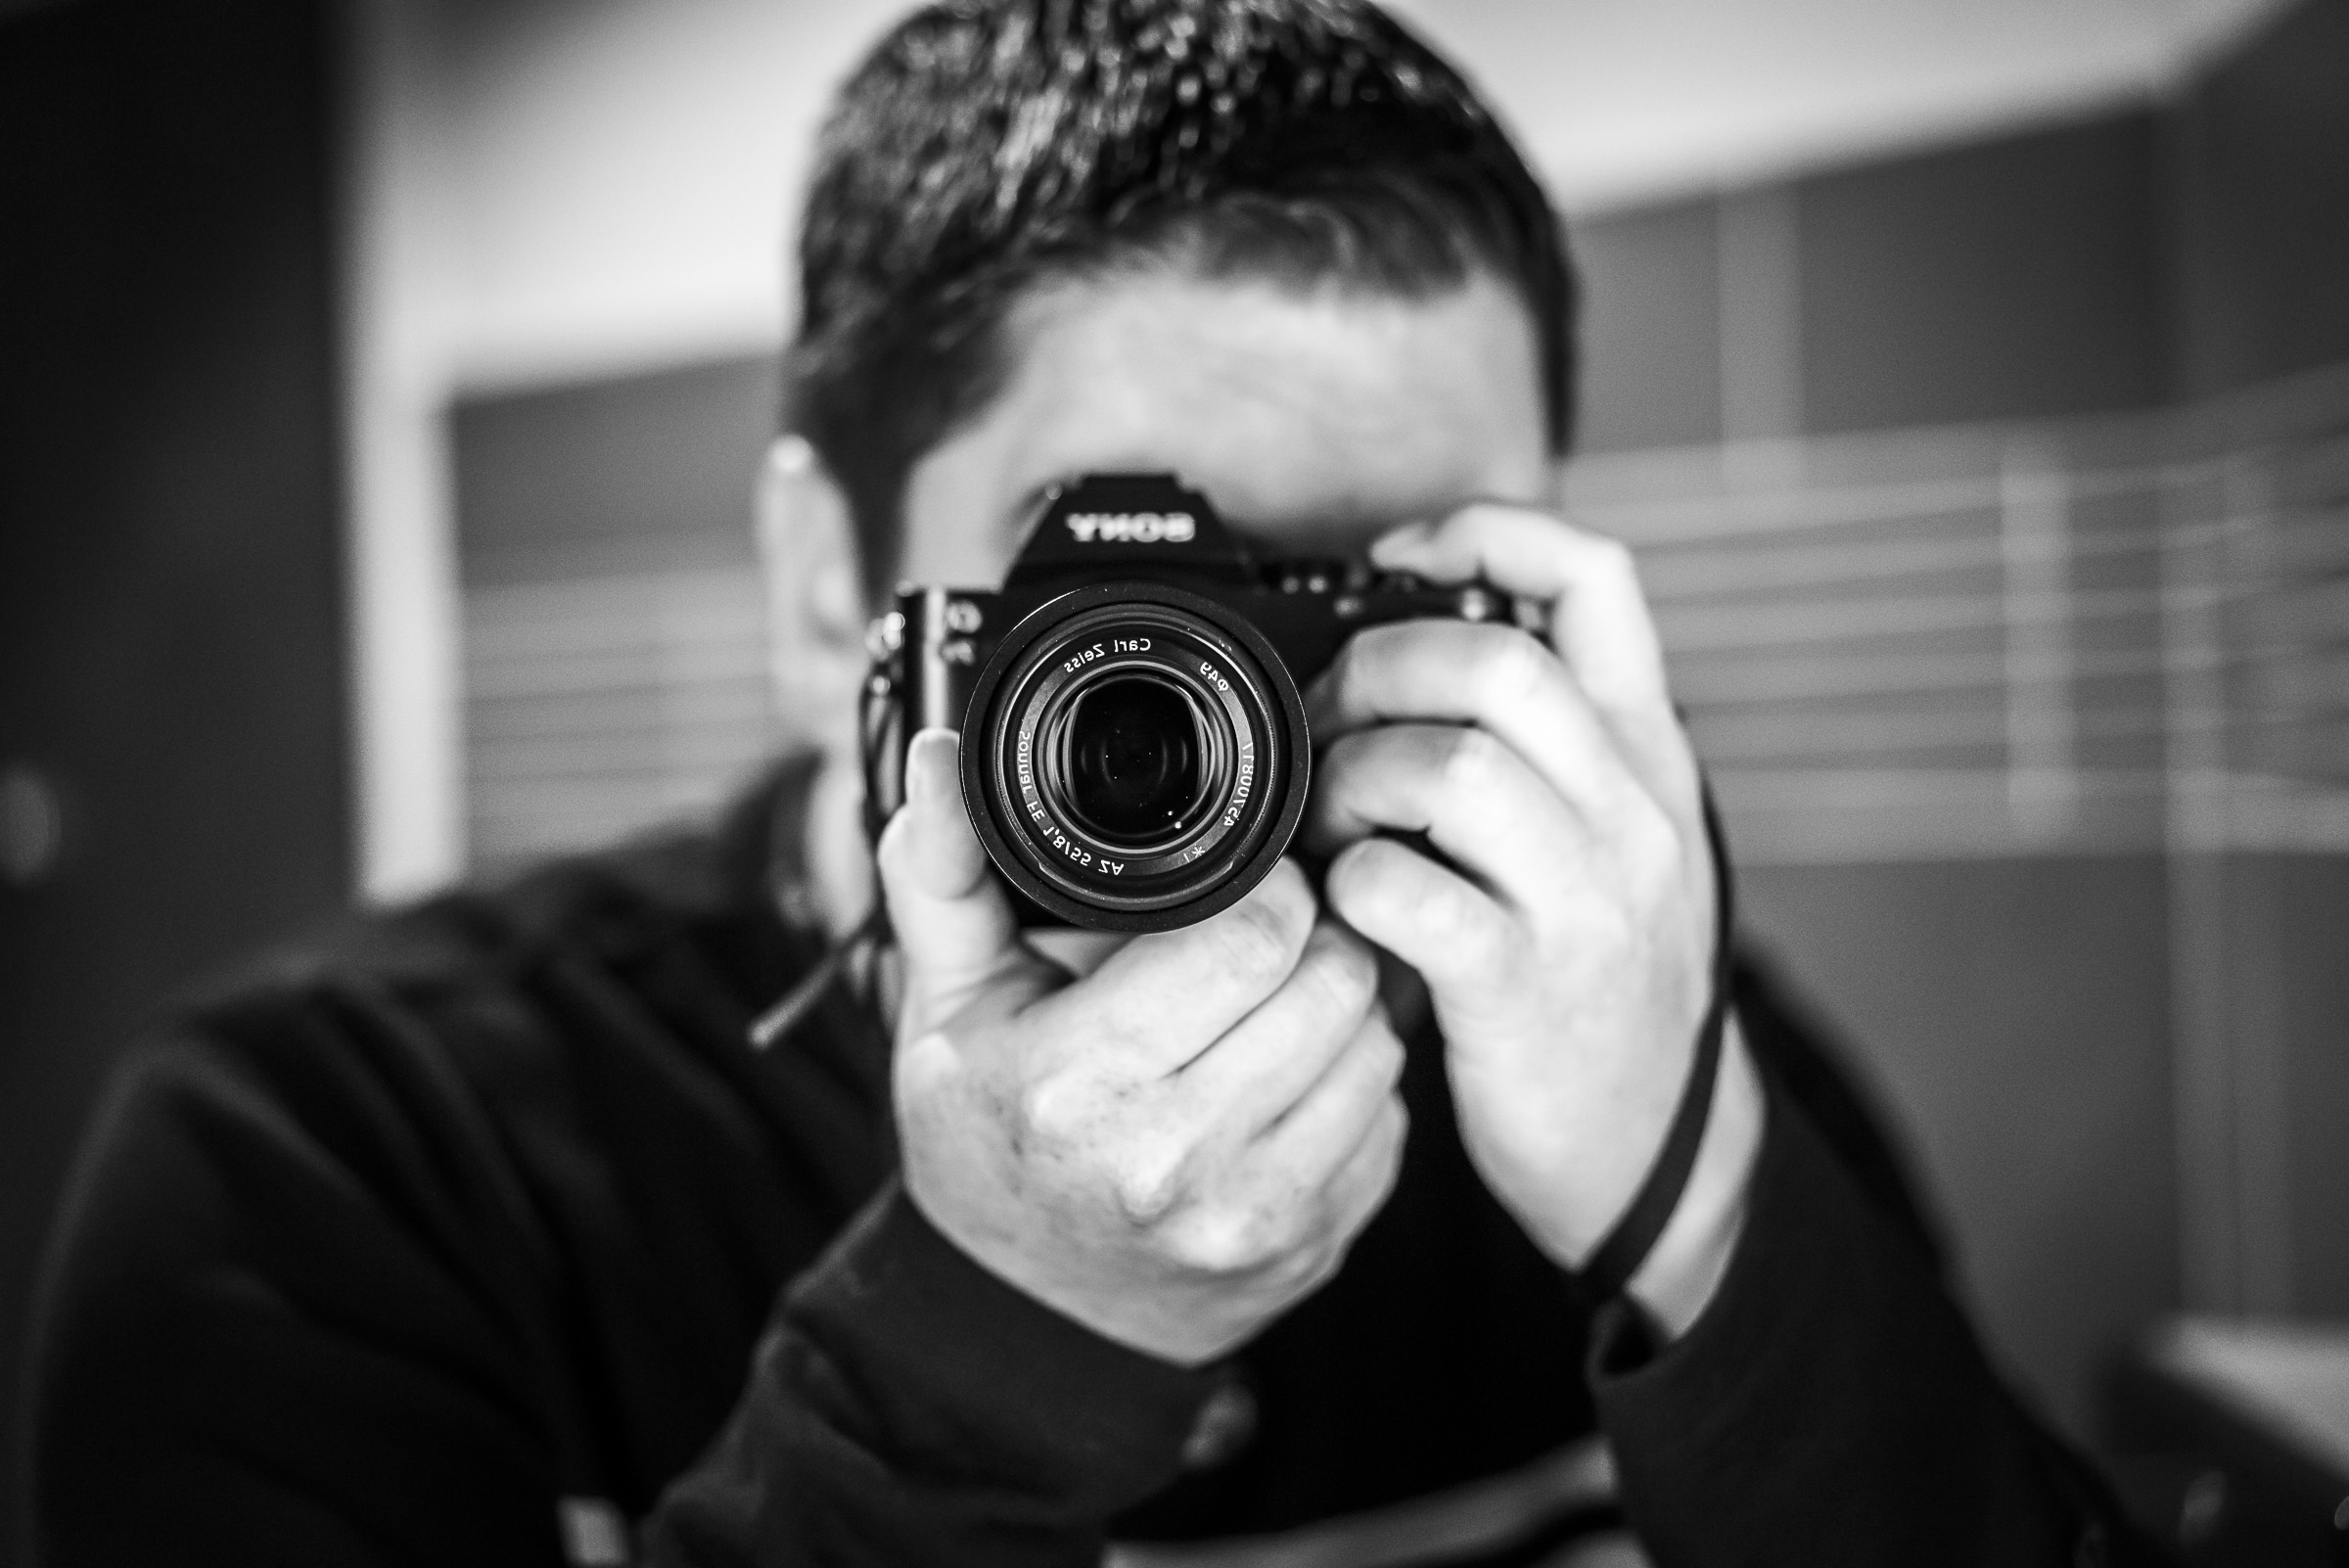
Mirror selfie. f/1.8, 1/125 sec, ISO 1600. © 2014 Samuel Morse
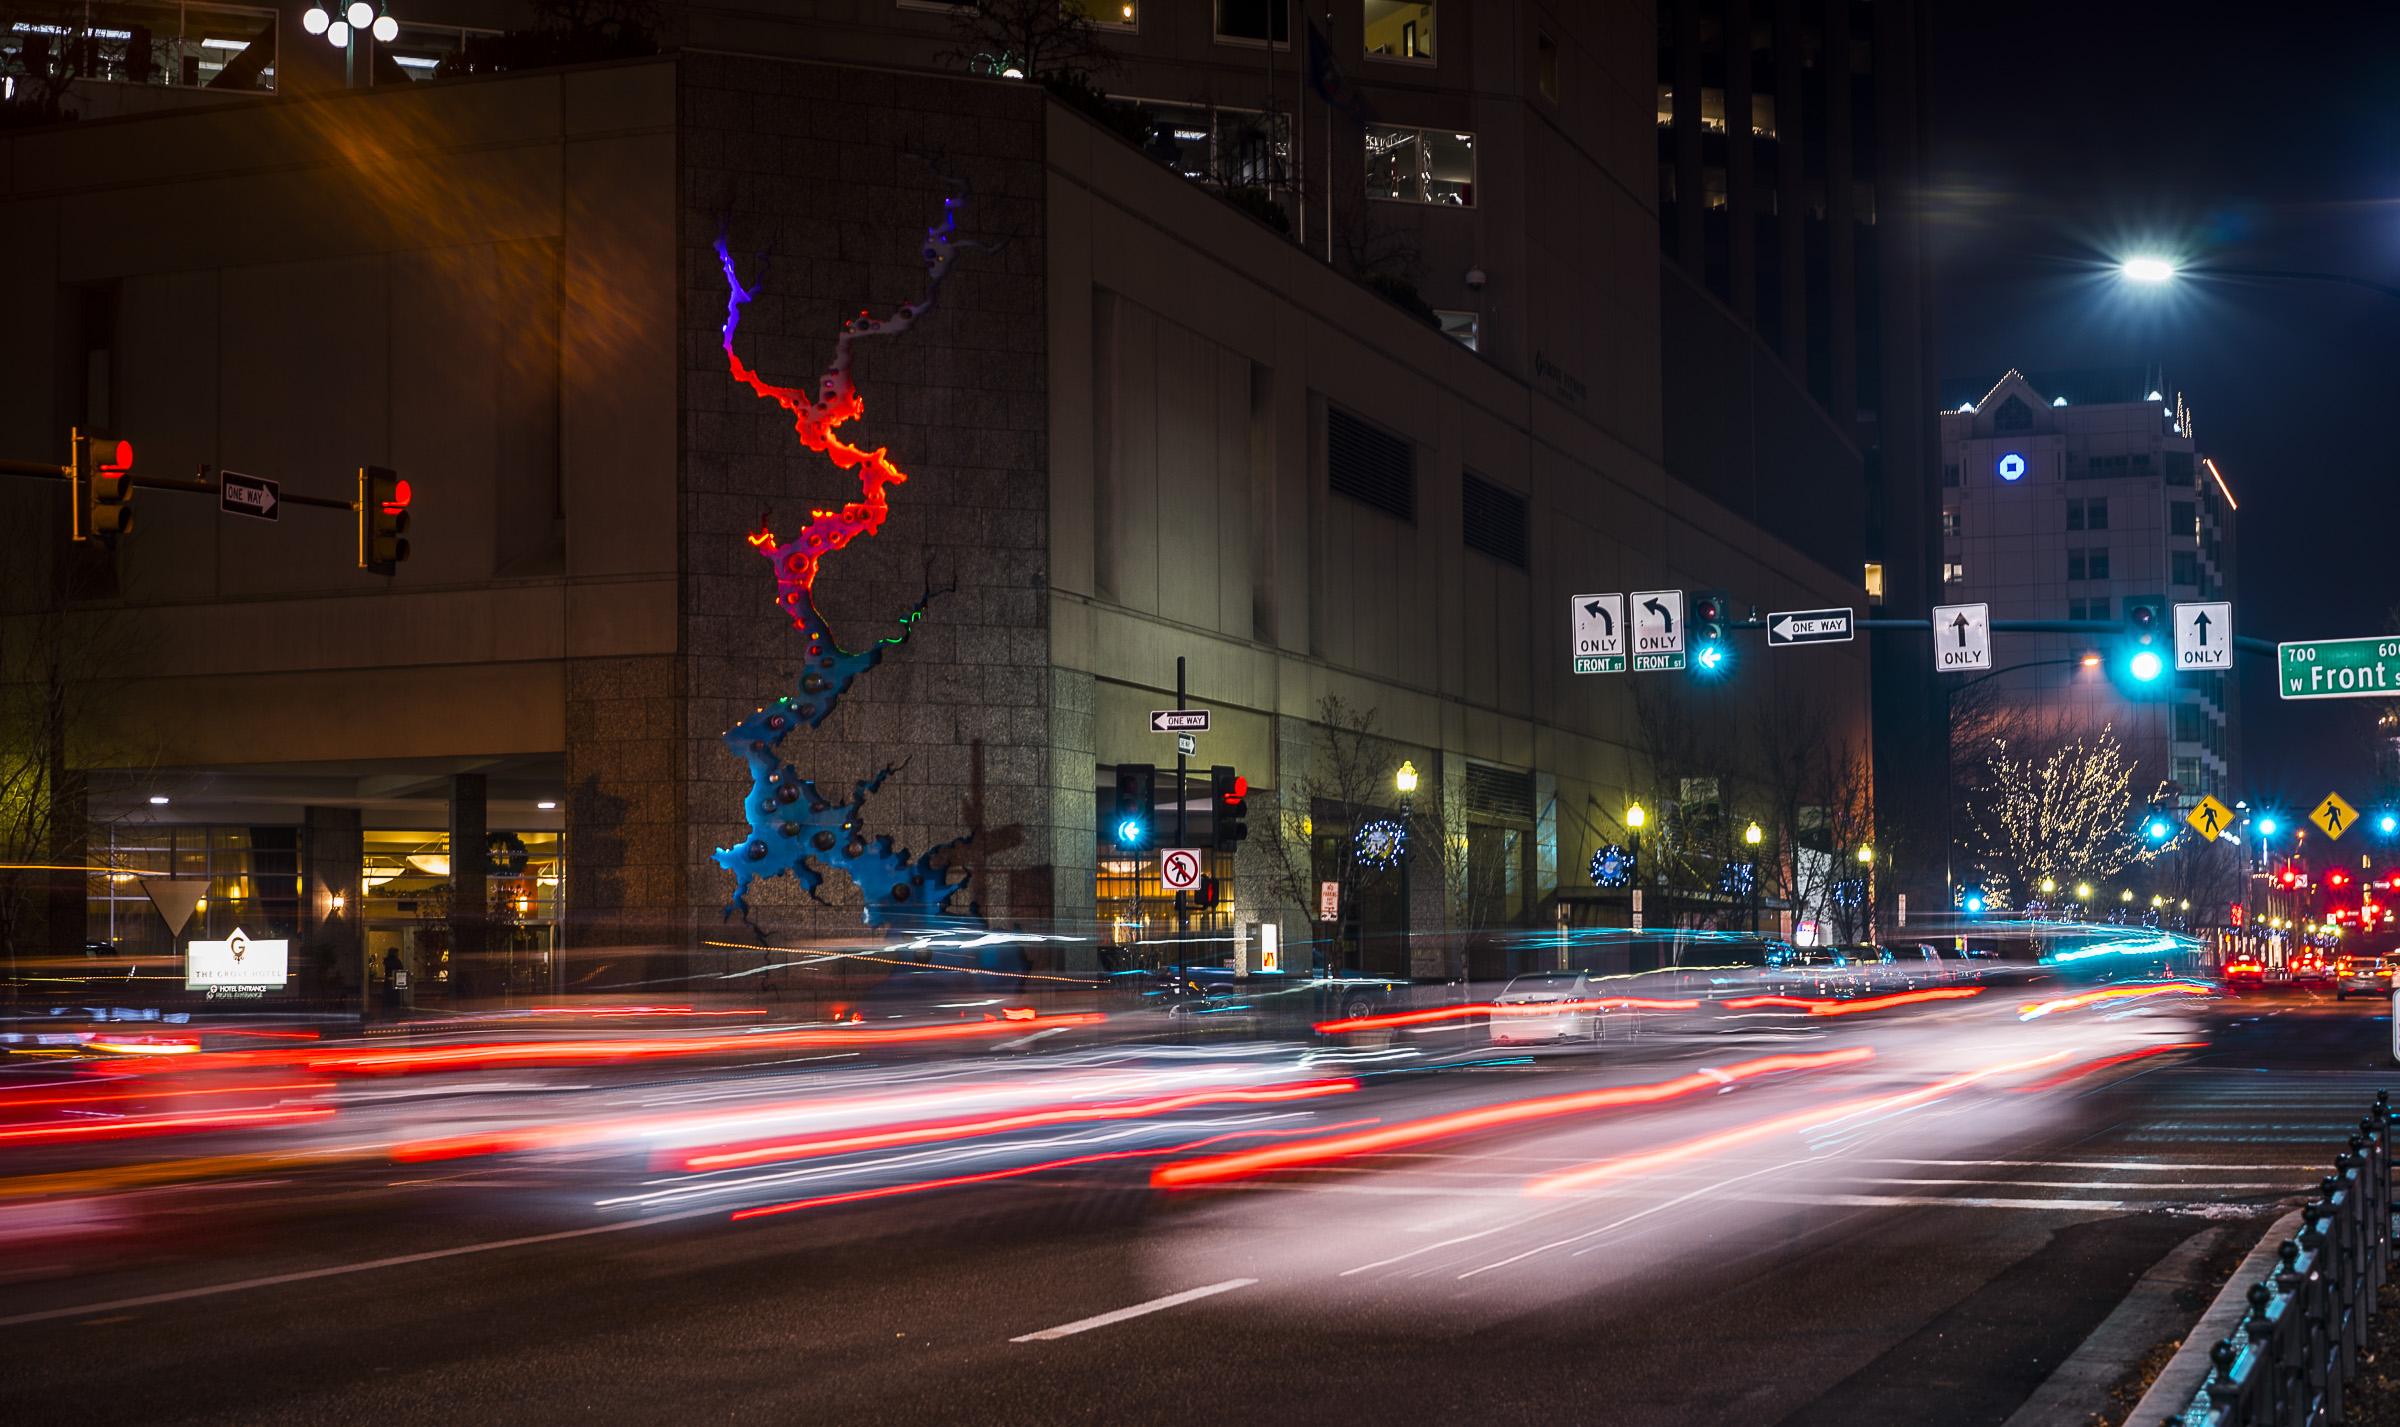
I braced myself against a pole for this one. f/5.6, 2 sec, ISO 100 © 2013 Samuel Morse

f/4, 1/60 sec, ISO 800 © 2013 Samuel Morse

f/1.8, 1/125 sec, ISO 800. © 2013 Samuel Morse

f/1.8, 1/320 sec, ISO 640. © 2014 Samuel Morse
Lensbaby Tilt Transformer top^

Lensbaby Tilt Transformer. Photo taken with a Nikon D800 and 45mm PC-E lens. © 2014 Samuel Morse

Nikon 35mm f/2 lens attached to a Sony α7R using a Lensbaby Tilt Transformer. Photo taken with a Nikon D800 and 45mm PC-E lens. © 2014 Samuel Morse
Early last year, I picked up a curious item for my Sony NEX-7, an E-mount Lensbaby with Tilt Converter. For those unfamiliar, Lensbaby makes special effect lenses mounted on gimbals allowing you to tilt the optic for creative purposes. While not a true “tilt/shift” effect per say, these lenses are widely used, even in cinema. This particular Lensbaby is unique though, in that it’s built in such a way that the entire front optic mount can be removed, and a Nikon F-mount is revealed underneath. Note that this is only true with the first generation E-mount Lensbaby; the current version does not include the Tilt Transformer mechanism. In any case, the gimbal is positioned to take up the extra flange distance needed for a Nikon lens to focus properly (Nikon lenses are mounted much further from the sensor to accommodate the mirror box). This means you can mount ANY Nikon F-mount lens onto any Sony E-mount camera and be able to tilt the lens in any direction in relation to the camera, and thusly tilting the plane of focus.
Now, this doesn’t work quite as well as a true, well-made tilt/shift lens like my Nikon 45mm f/2.8 PC-E lens that I used for most of the “product photos” in this article. However, it does still work surprisingly well, and amazingly enough, still works well on the full frame α7R. I was worried that by tilting the lens, the image circle would shift just enough that I’d get bad vignetting in the image, but you really have to try get get that to happen. Vertical tilts seem to work with no issue on any lens, while horizontal tilts (known as “swing” in proper terminology), can sometimes yield a slightly dark edge on one side.
All and all, it ends up being kind of like “lens whacking” but without the light leaks. This is both good and bad. It keeps the lens secured to the camera at least, but this Lensbaby design is a little older, and doesn’t tilt as easily as some of the newer designs, often getting stuck in various positions requiring me to manhandle it from time to time.
In any case, it’s a great creative tool that I look forward to using in the future. Here are some samples using the Nikon 35mm f/2 lens, which seems to compliment the α7R well in both form and function. The aperture ring especially helps with dialing in a specific aperture. These are all the cliché “miniature effect,” but they still serve as an effective demonstration.

Lensbaby Tilt Converter with Nikon 35mm f/2, ISO 1250 © 2014 Samuel Morse

Lensbaby Tilt Converter with Nikon 35mm f/2, ISO 12800 © 2014 Samuel Morse

Lensbaby Tilt Converter with Nikon 35mm f/2, ISO 1600 © 2014 Samuel Morse

Lensbaby Tilt Converter with Nikon 35mm f/2, ISO 1600 © 2014 Samuel Morse

Lensbaby Tilt Converter with Nikon 35mm f/2, ISO 1600 © 2014 Samuel Morse
Conclusion top^
The α7R is truly a fantastic camera that has made me excited about photography once again. Sure, I only have one native lens for it right now, but that’s liberating in a way, since it simplifies my “for-fun” photography, bringing me back to the basics. Here are a few types of people I could really see loving the α7R like I do:
- Pro photographers who want a compact “fun” camera that doesn’t sacrifice quality
- Street photographers who want a Leica but can’t afford one (and don’t mind a slightly louder shutter)
- Photojournalists who want a lower-profile camera that can beam photos to their phone for e-mail and publishing
- Film-makers who love shallow depth of field but want something compact yet full-featured
- Photo enthusiasts who want to step up to a better camera, but don’t want the cost or heft of a Nikon D800 or Canon 5D mark III.
This probably isn’t for these types of people:
- Sports photographers
- People who need as quiet a camera as possible (e.g. Leicas or the Sony RX1)
- People who will only ever post images to the web (36 megapixels is a bit excessive for that purpose)
- Other types of photographers who need super-telephoto lenses or ultra-wide lenses
- People who really rely on optical image stabilization
- People who need the most possible flexibility and lens options with full electronic support
My two main cameras before the α7R were the Nikon D800 and Sony NEX-7. Here are some quick comparisons, good and bad, between them. Green is good, and red is bad.
Compared to the Nikon D800
- Nearly identical resolution and image quality
- Half the weight and size
- Slightly slower frame rate
- Much slower navigation and zooming
- Only one card slot
- More customizable buttons, more dials, but fewer standard buttons
- Harder to move AF point
- Addition of 60p, 60i, 50p, and 50i frame rates for full HD video
- Option for direct XLR input with phantom power via adapter (not through the 1/8″ stereo input)
- Less battery power for lenses and shooting
- Slower AF
- The new Zeiss glass is sharper than equivalent Nikon glass
- No battery charger
- EVF is better for video shooting and gives accurate preview of final image before its taken
- WIFI and NFC image transfer and monitoring
Compared to the Sony NEX-7
- Better resolution and image quality
- Better high ISO performance
- Slightly larger and heavier (only slightly)
- Much slower frame rate
- Faster navigation
- More customizable buttons
- Easier to toggle between modes
- Better rolling shutter performance
- Option for direct XLR input with phantom power via adapter (not through the 1/8″ stereo input)
- Same battery, but drains a little faster (and no extra charger)
- Faster AF
- Slower/louder shutter sound
- Longer shutter lag
- WIFI and NFC image transfer and monitoring
- Weather-sealed
So, should you buy it? There’s no clear answer to this question. It all depends on what’s important to you. A lot of it comes down to speed versus size. If compact size is really important to you, this is an excellent option that will make the minimum of sacrifices versus a dSLR.
Sony α7R © 2014 Samuel Morse
Wow, impressive! Thanks for the review, Sam.