 That’s the favorite phrase of my good friend Parker Gyokeres, usually when something goes horribly wrong, which is pretty frequent when you’re dealing with the “electronic divas with bipolar disorder” commonly referred to as drones.
I’m not going to lie, flying remote-controlled aircraft, especially multicopters, is a LOT of fun and I’ve managed to capture some spectacular shots. It immediately adds production value to your project, and turns heads both on location and online. The thing is, there’s a lot more to it than most people realize, and a lot of things that can, and do, go wrong.
First thing’s first though, where can you get a drone? There are three main options here, buying a prebuilt one off the shelf, getting a custom-made one from a guy like Parker, or building one yourself. Each of these have benefits and drawbacks, so let’s break it down.
Prebuilt, off the shelf drones

GoPro Hero3+ on a DJI Phantom 2 © 2014 Samuel Morse
DJI Global has made a name for itself with their Phantom, Phantom 2, and their recently announced Inspire 1.
Pros: With a wide consumer base and massive corporate backing, these are easy to get a hold of and there are tons of accessories custom-made for it. These are also really easy to set up and get flying, and you can conceivably be airborne within minutes of opening the box. For the most part, these just work with an absolute minimum of fussing and adjustment.
Cons: Because they are so easy to fly, people often buy them having no idea how dangerous they are to themselves and others, flying them carelessly and don’t realize how little they know until it’s too late. Luckily, you’re reading this blog, so hopefully this won’t apply to you. However, there are a lot more downsides, even to someone well-versed in how to handle a drone. The fact that it’s a mass-produced item manufactured from the ground-up means that it’s not always easy to customize or repair. Most of the time, a broken part means replacing a whole section rather than a single piece. On top of pricy repairs, it can be much more expensive to buy one of these pre-built options than building one yourself, especially if you want a lot of customizations. Lastly, all of DJI’s prebuilt products are quadricopters, meaning four rotors, which is a design more prone to falling out of the sky (I’ll cover that more later).
Custom-built jobs by a pro

Parker Gyokeres of Propellerheads Aerial Photography soldering the electronics on a new multicopter.
This is kind of a best-of-both-worlds scenario. You can get something that is exactly what you want without having to learn the ins and outs of building a multicopter yourself.
Pros: Prebuilt so you have a minimum of setup time and learning curve. Because it’s a custom job, you can get exactly what you want as long as your bank account can afford it. The builder will usually give you all the tech support you need, and can easily repair your rig using just the parts necessary rather than replacing whole sections. It’s also easy to upgrade these rigs since they’re not designed for a specific set of parts.
Cons: Since you’re paying someone to build rather than buying parts, you still end up paying more than building it yourself, assuming you have all the tools necessary to build. While you get a custom rig built to your specifications, if you don’t know much about the parts being used, you may still not get exactly what you want, simply because you don’t know what you want. A bit of research can certainly help with this, but once you’ve done a lot of research, you might as well just build it yourself. Also, battery charging becomes a little more difficult. Because you’re using hobby batteries and a universal charger, there’s a lot more that can go wrong. The tradeoff is that the batteries are lighter per mili-amp hour, but at the expense of convenience.
Build it yourself
This is probably the pinnacle of awesome, and certainly gives you the best price and customization. The video above shows most of the process involved in building a multicopter yourself. See more about the parts and pieces that go into building a multicopter in my blog “Multicopters deconstructed.”
Pros: As long as you’re buying from a good dealer, buying parts is cheaper than buying something pre-built. You can prioritize what you don’t need versus what you can’t live without. Since you built it, you can usually fix it yourself by just purchasing a new part to replace the damaged one. Most controllers (usually referred to as transmitters or TX) are programmable, so in the process of building your drone and programming the TX, you can dial in the controls to be exactly what you want. If you don’t like the way it flies, you can fix it.
Cons: If something goes wrong, YOU have to fix it. There’s a steep learning curve here. Having a friend who does this sort of stuff helps a LOT. Sometimes the problem isn’t very easy to fix, and there’s no manual because you built it. There are inherent dangers too, especially when soldering electronics and battery connectors. A misstep could mean a large fire, explosion, or at the very least, minor injuries. Also, there are a considerable number of tools required to build a drone, depending on what frame you go with. A soldering station, screwdrivers, knives, heat gun, cable tie tightener, crimper, as well as supplies like double-sided foam tape, shrink wrap, etc., all adds up really quick.
Choose your airframe
Even after you decide on where your multicopter comes from, the decision-making is not over. There are a lot of different types of multicopters, each with their own pros and cons. I’m not going to list prices, mainly because they can vary so greatly depending on what parts are used. Just from DJI alone, a quadricopter can cost anywhere from $500 to $3,300 depending on what model you buy.
Tricopter: This design has three motors evenly placed around the center. These generally aren’t used for lifting cameras due to the limited number of propellers. They do make fun fliers though and are relatively simple to build using a frame from Fortis Airframes. There’s a little bit of added complexity due to the fact that it needs a servo to physically tilt the tail propeller to get yaw (turning) movement. Also, the DJI Naza-M flight controller can’t do tricopters, so it limits your ability to have things like GPS positioning. Additionally, there’s no redundancy in the motors, so if one goes or a propeller stops, it will fall out of the sky.
Quadricopter: These use four motors arranged in a square formation, usually around the top of the multicopter. Thanks to DJI, this is the most common type of multicopter. It’s an efficient design and with more robust motors and larger propellers, it can lift a decent sized camera. Quads are fairly stable, but there still aren’t enough motors for redundancy. So, if one motor or propeller stops, the opposing motor will cause the quad to flip on axis with the other two motors all the way to the ground.
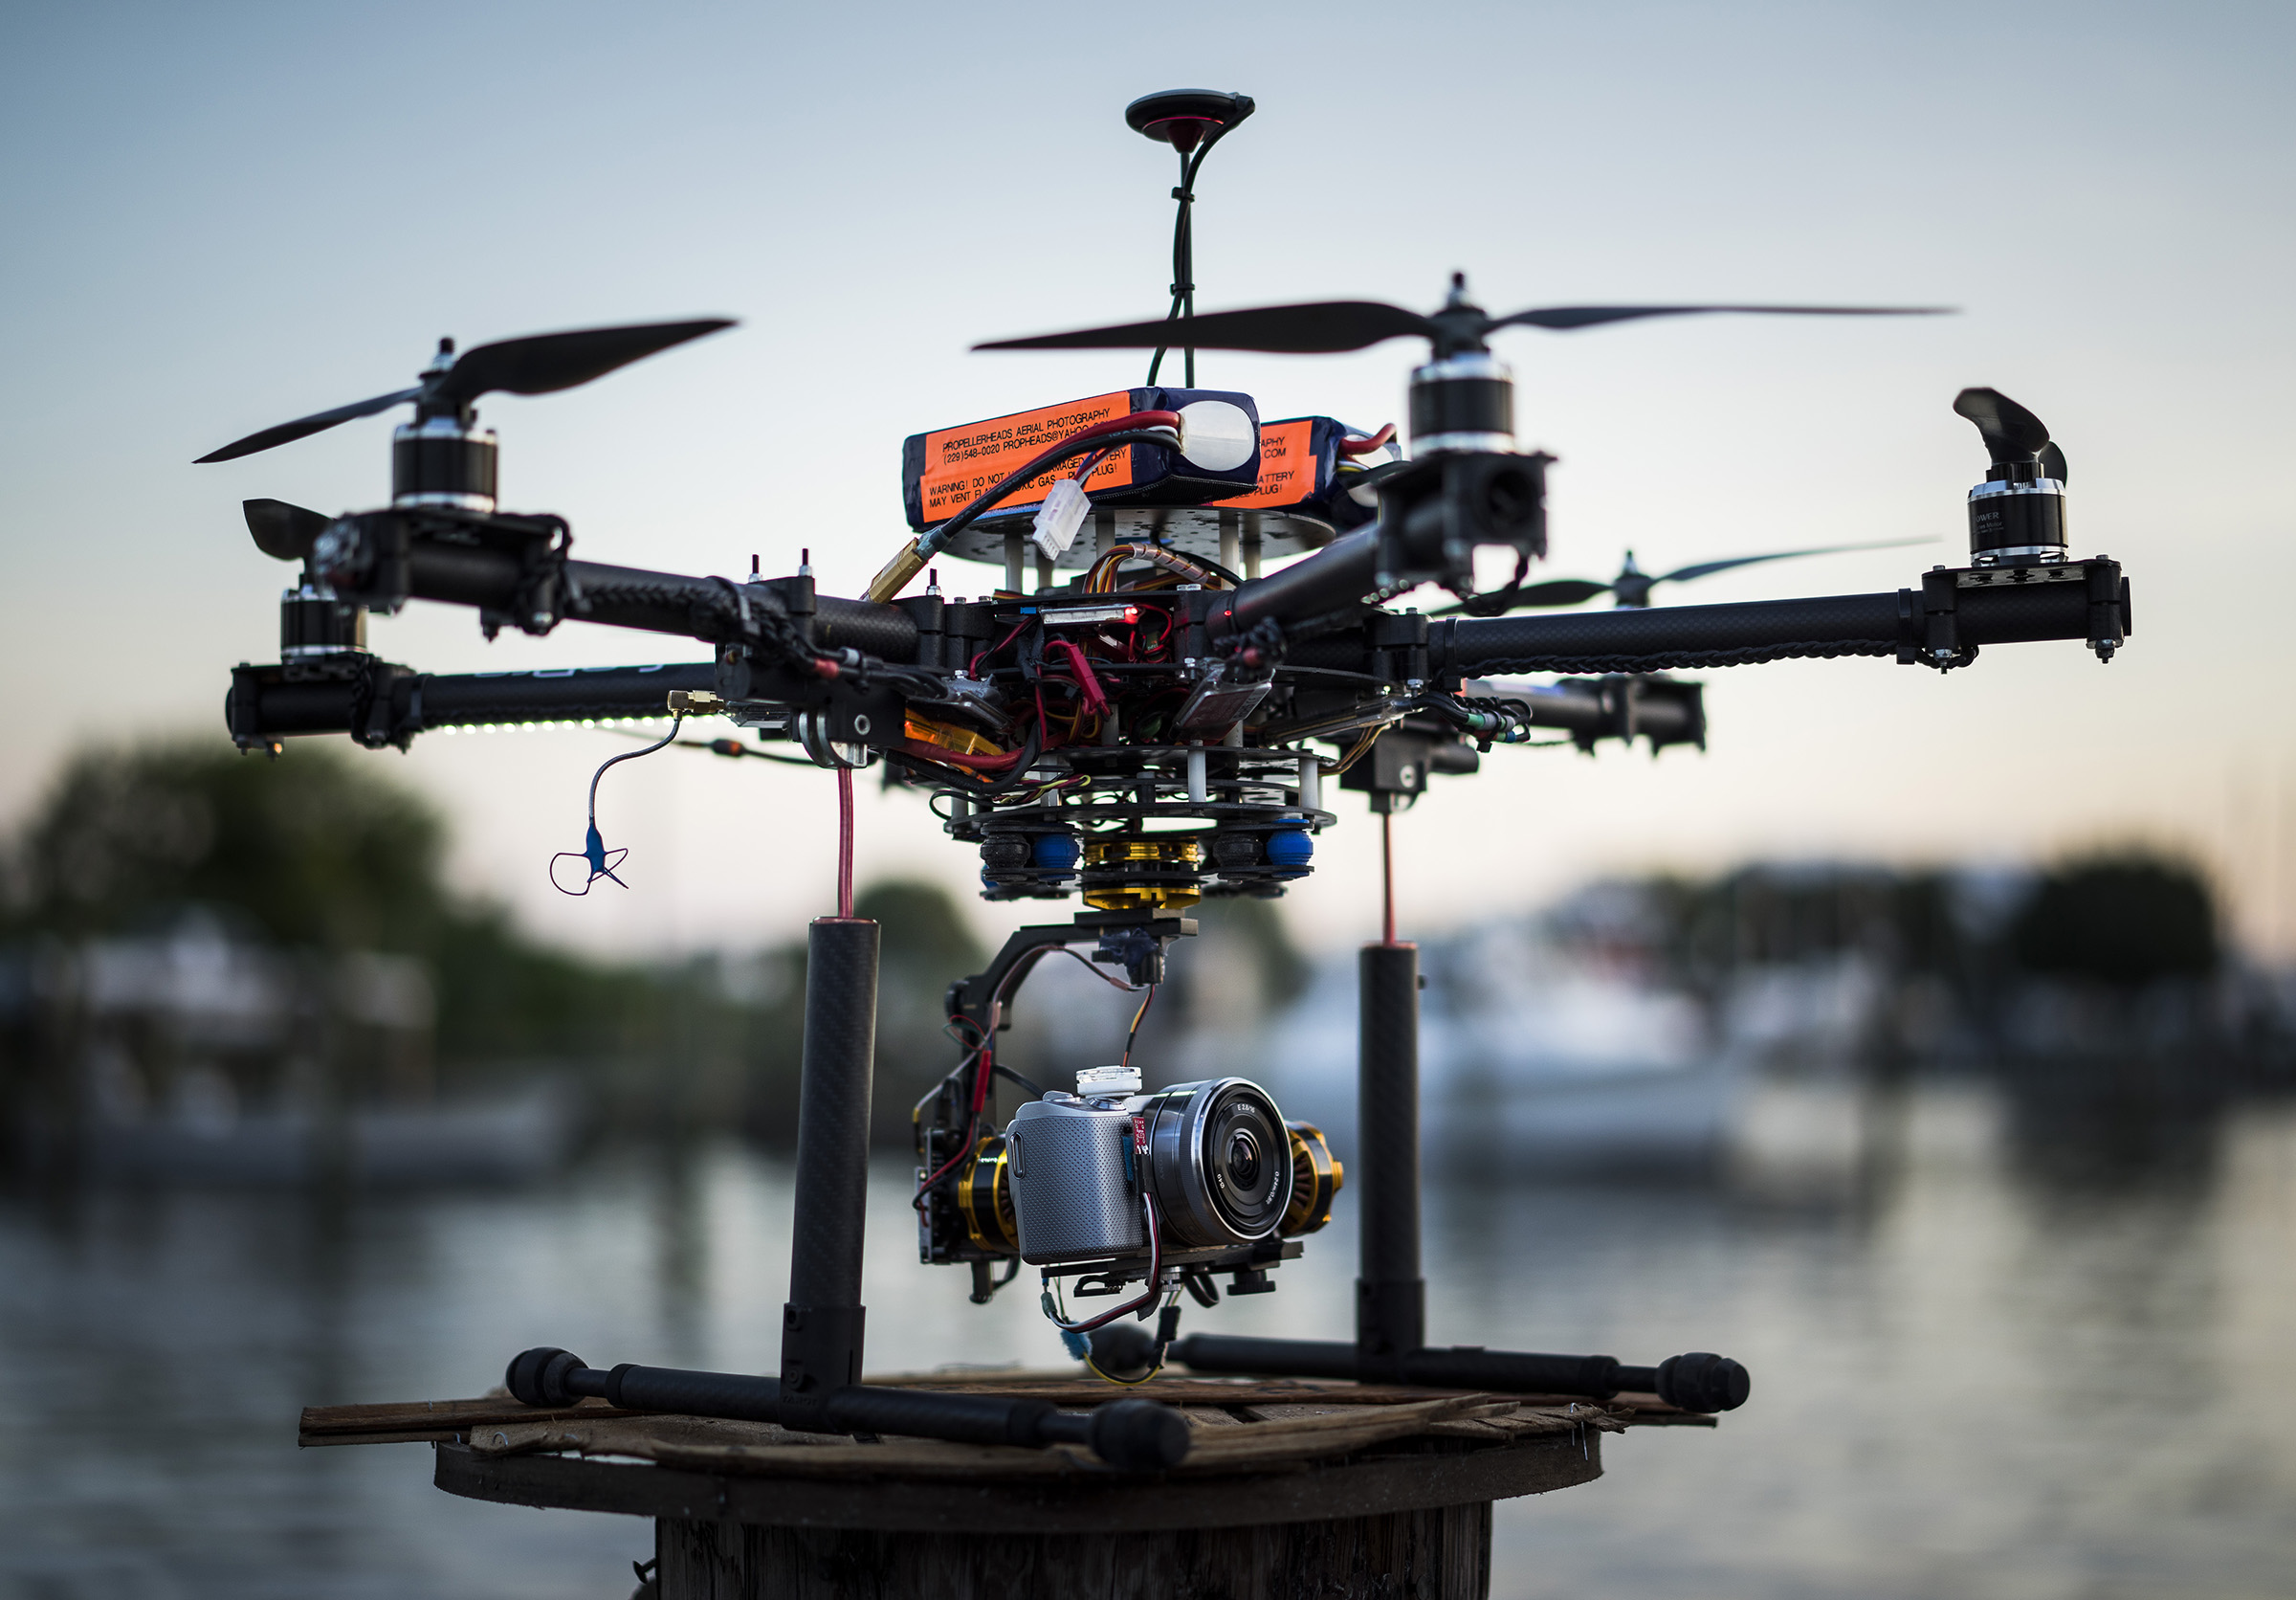
Hexacopter design by Parker Gyokeres
Hexacopter: This type uses six motors arranged in a circle (or hexagon depending on how you look at it). More motors means more lift potential as well as redundancy. It’s still not ideal, but with the right flight controller, you should be able to maintain enough control to land safely with minimal damage. These are really common in professional rigs.
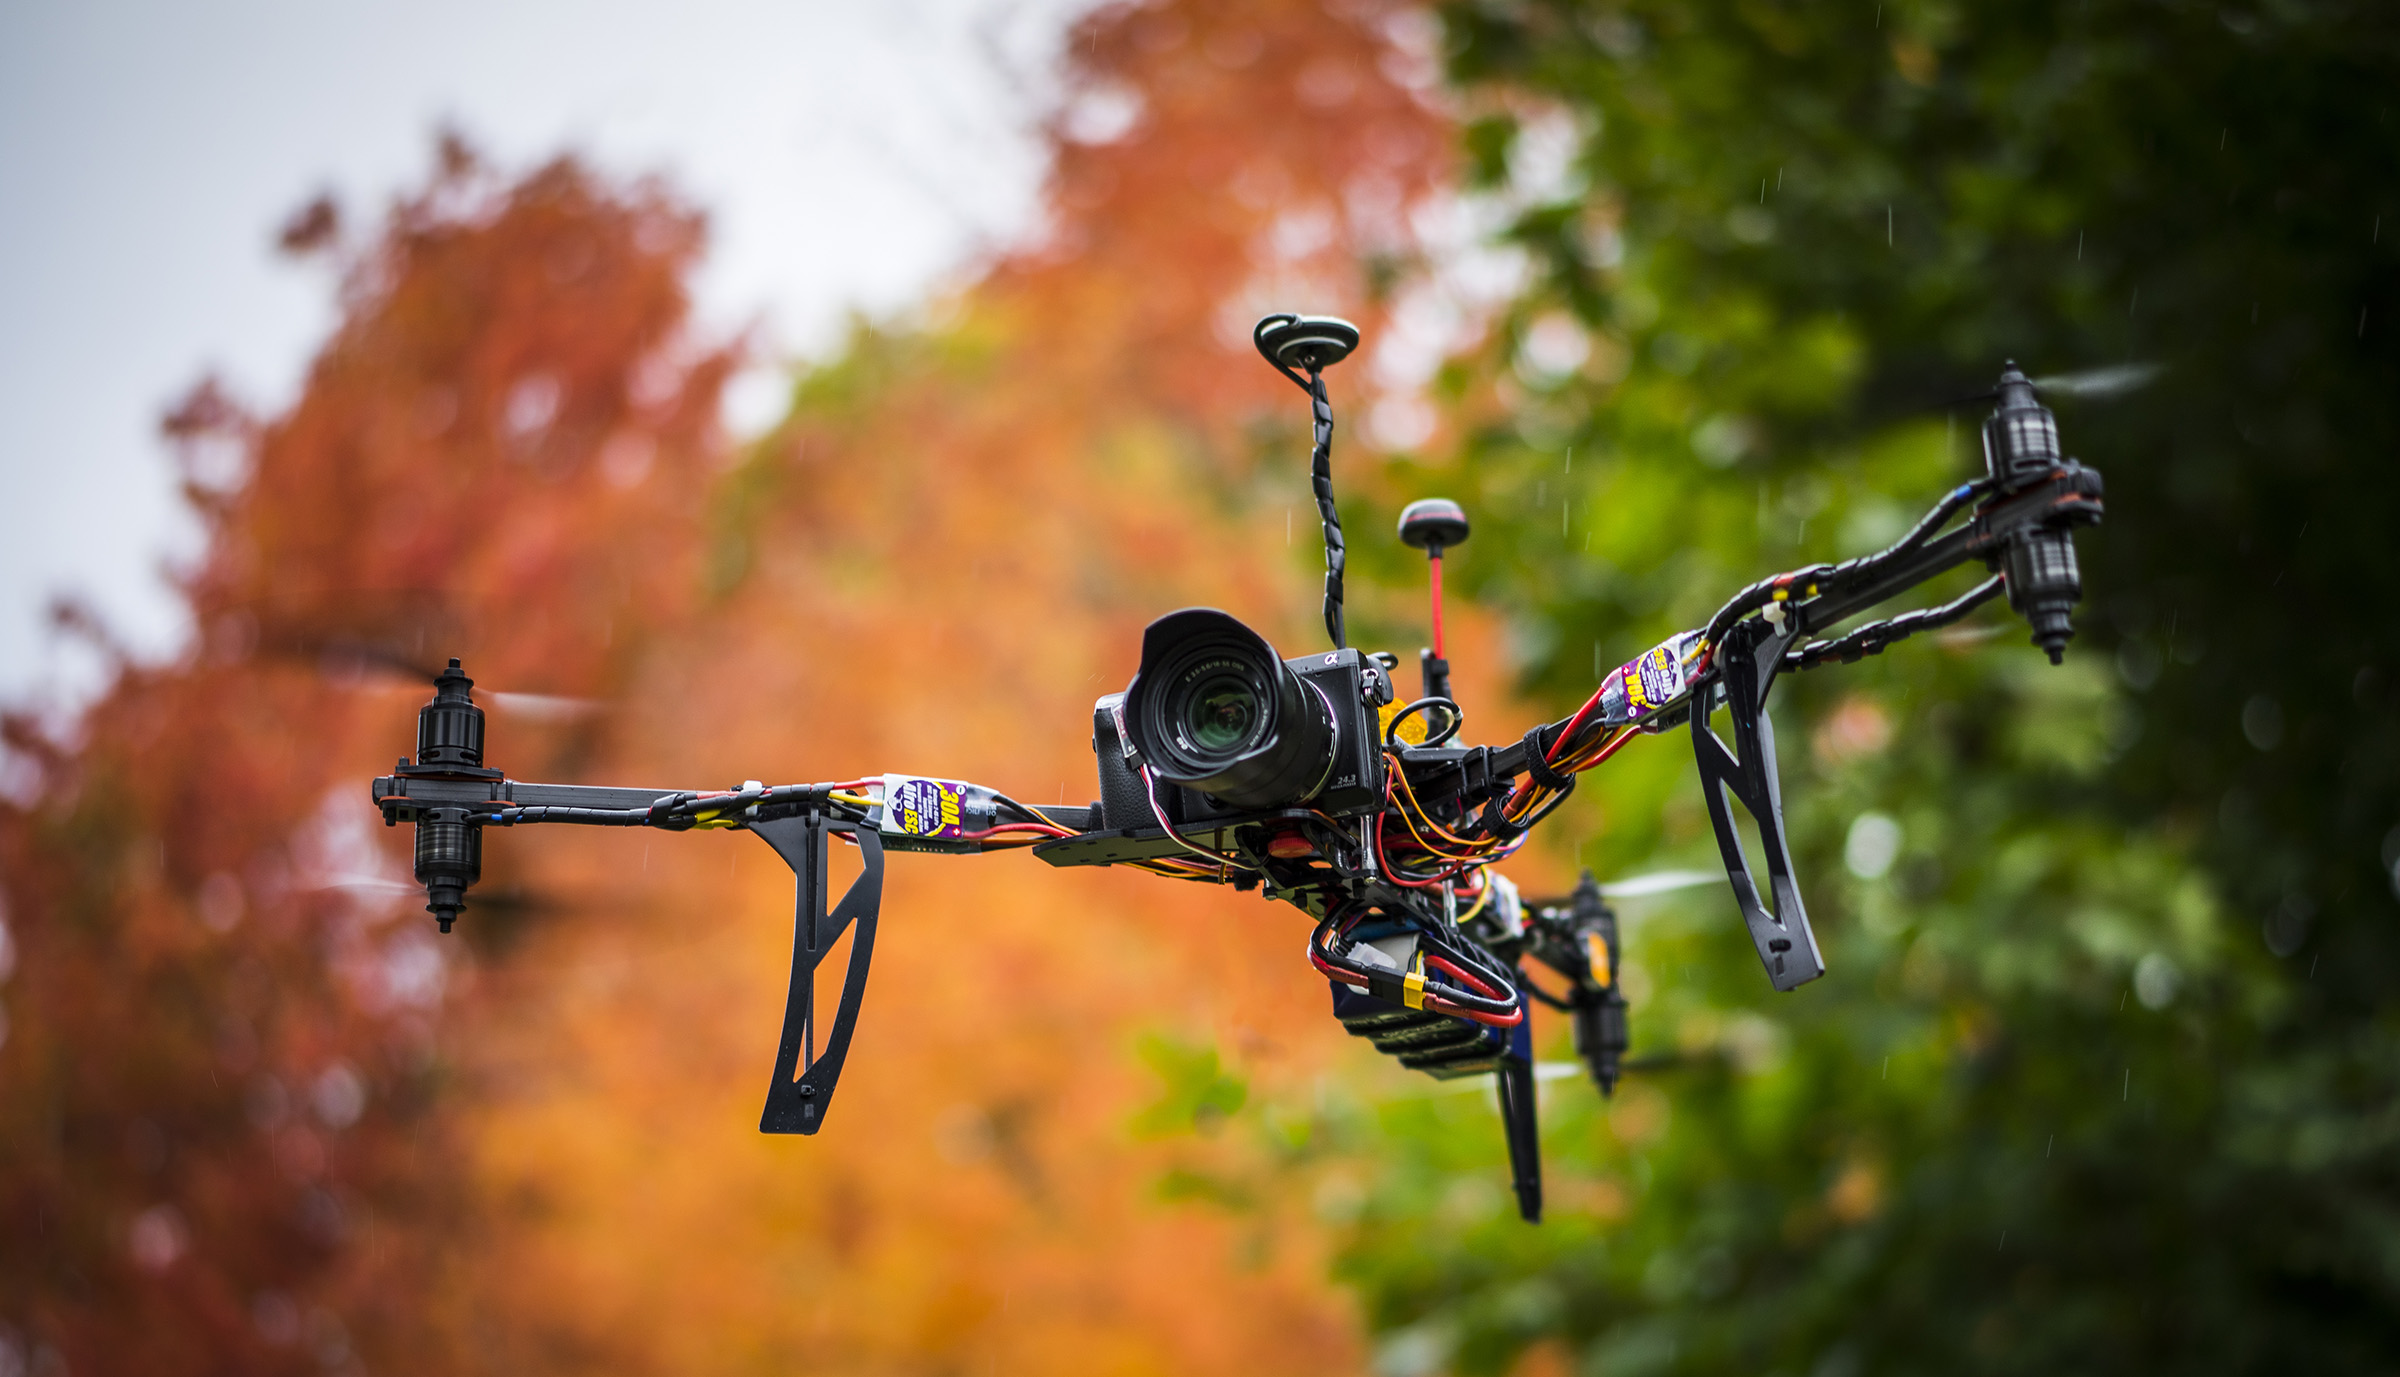
Y6 multicopter using a Fortis Airframe.
Y6 Hexacopter: This is the type of multicopter I recently built. It has three arms like a tricopter, but with an engine on the top and bottom of each arm, counter-rotating for stability. There are a lot of benefits to this design. Even though you lose a little bit of efficiency in the motors because they’re so close to each other, it still has plenty of lift potential, and is incredibly stable. It also has nearly perfect redundancy, so stopping one motor barely affects the multicopter. While a brush with a tree caused my Phantom to fall out of the sky, Parker clipped a bush with his Y6 and the multicopter just kept going. Granted, powerful engines and carbon fiber propellers certainly helped it just clip through the leaves rather than stopping, but I’m pretty sure the Y6 design helped too. Another really great advantage is that a front-mounted camera on a Y6 has perfect visibility above and below the horizon. Often times, cameras are mounted below the propellers on quads, hexacopters, and octacopters, but that means that if the camera looks up, the propellers come into view. With the arms spread out so far, a Y6 allows a front-mounted camera to look both up and down, really expanding the possibilities of shooting. (Fortis also makes an excellent Y6 frame I used for my multicopter)
Octacopter: This is the same idea as the hexacopter, but with two additional arms and motors for even more lift capacity and redundancy.
Camera mounts and gimbals: Camera placement and mounting can have a drastic impact on your imagery too.
- A stationary camera mount may work for stills, but it usually won’t work for video. Especially in GPS hover mode, multicopters will move a lot to try and correct minor turbulence and other small positioning adjustments.
-
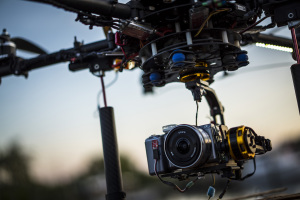
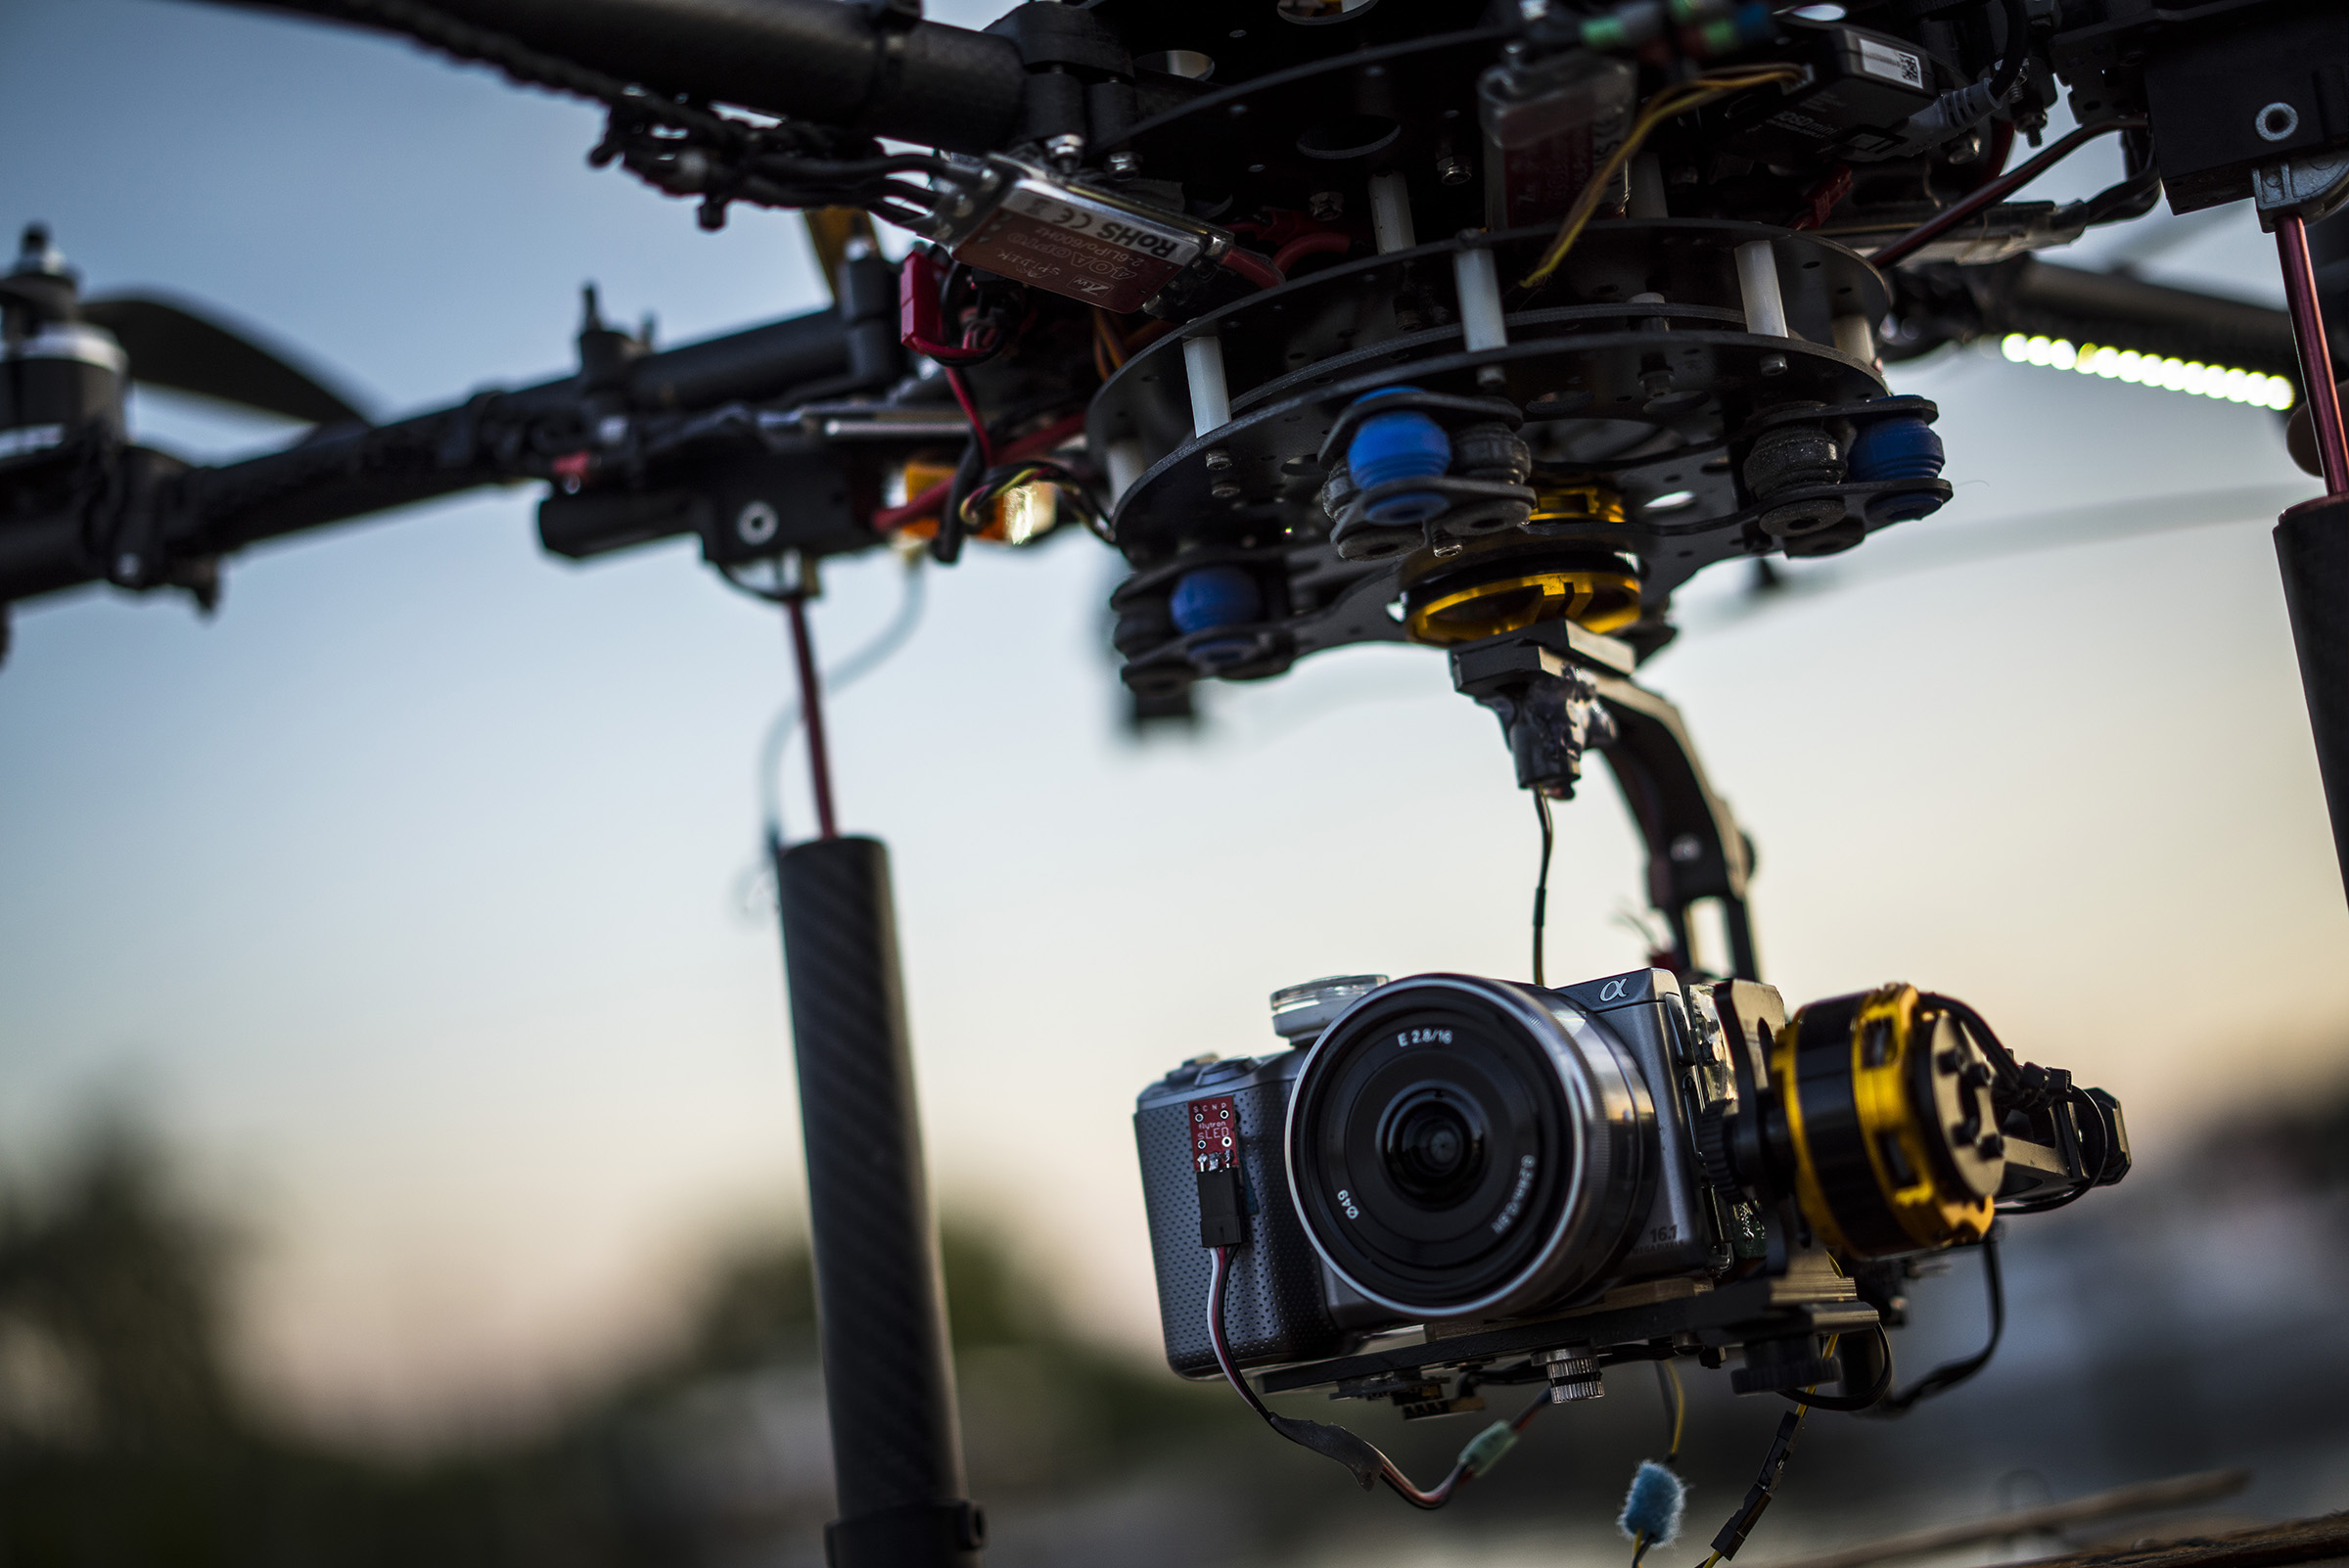
Closeup of the gimbal mechanism. The gold cylinders are brushless motors that actively level the camera.
A gimbal with brushless motors can actively position your camera so it stays level, and can also give you tilt and/or pan capability on your controller. Most camera gimbals are mounted on the bottom of the multicopter to keep it closer to the center of gravity. The problem with this is that tilting the camera up will cause the propellers and possibly the multicopter itself to creep into the shot. The propellers can also cast a shadow on the lens if it’s not protected by a lens hood, and this can show up as a flicker or even banding in the video, depending on the amount of rolling shutter (this is a big problem on the DJI Phantom). The main positive to this is that if you can put in retractable landing gear, a three-axis gimbal can sometimes turn 360º independently of the main airframe, opening up the possibility to have a separate pilot and camera operator.
- A front-mounted camera on a quad, tri, or Y6 design has an unobstructed view. A three-axis gimbal wouldn’t work, but a two-axis gimbal would open up some incredible opportunities, making it possible to have a continuous shot that looks up and down.
Camera considerations
For aerial photography, some things matter, but others don’t. When picking a camera to fly, you want to balance what you need with what you want. The heavier the camera, the larger the multicopter needs to be, and the more it will cost. Here are some things to think about:
- Smaller sensors can actually be a good thing. For aerial work, you usually want everything in focus, and small sensors can do that easily.
- Wide pancake lenses can be your friend. At the very least, use prime lenses (fixed focal length) to cut down on weight and increase quality.
- A “fast” lens isn’t usually necessary. An f/2.8 prime lens or f/4 zoom lens is more than enough.
- Don’t fly DSLRs. They’re big and heavy. Mirrorless cameras and compacts sometimes have the same quality at a fraction of the weight.
For ultra-lightweight, go with a GoPro Hero4 Black Edition. For something that will be great for video, the Sony RX100 mark III is an excellent choice. For something a little bigger with interchangeable lenses, the Sony NEX-6 is flexible and fast, and the Nikon 1 J4 would be a good option as well, especially given the weight. If you need the best quality 4K video, go with the Panasonic GH4. If you want the best low light performance, the Sony α7S. For the maximum resolution, the Sony α7R has you covered at 36 megapixels.
Practice and know your gear
Once you have your multicopter, really get familiar with it. Unless it can fit in the palm of your hand, have a healthy respect for it and remember that it’s not a toy. A friend of mine bought a Phantom and the first time he flew it, it started drifting towards him and he instinctually stopped it with his hand. The propeller cut into his thumb so deep he saw bone. Respect the crazy and be sure to fly in a wide open area for your first flight. I made the mistake of flying in a confined area for my first flight because I wanted my first footage to be epic. It was a mistake; see below…
Mere seconds after taking off for the first time, I crashed my Phantom. It was drifting and I didn’t know how to control it yet. I got out of the way, and the drone was fine, but it’s still embarrassing. Doing simple drills with your flying, learning to move in whatever direction you need regardless of airframe heading (easier said than done), can help you better manage your flying. It should be instinctual and you never want to fly beyond your skill level. For instance, if you’re still learning how to maneuver, flying in confined quarters may not be a good idea, or if you rely heavily on GPS mode to stay stationary, you may not want to fly indoors where there’s no GPS signal.
Ultimately, expect to crash at some point. It’s not a question of if, but rather when. Much of the rest of your safety practices should be based around this principle, because when your precious multicopter decides to fall out of the sky, it will do so with terrifying speed. This is also why you don’t want to fly something you can’t afford to lose or replace.
Stay safe around people
It should go without saying that you don’t want to hurt people. As I’ve said before, when things go wrong, they go wrong at an alarming speed. For this reason, you want to take care where you fly, and what’s going on around you.
First, don’t fly over people or cars. It’s really tempting to fly over a crowd at a concert, but history has shown that this is a really bad idea. The propellers and weight of a falling drone can seriously hurt someone, and even if you’re super careful, the band or audience might throw a beer can at it or other object that causes it to fall anyway. Just don’t do it. A single cool shot is not worth the potential lawsuit or broken gear.
You also have to be careful of your surroundings near the takeoff and landing zone. People are drawn to these things, and kids, doubly so. Make sure you talk to the people around you before you takeoff and make sure they understand the inherent dangers and how far back they need to stay. Don’t assume children will listen though, so make sure there is an adult nearby who can stop them if necessary. I remember one time seeing a guy flying a hexacopter in a busy outdoor mall. A child kept running up directly below the multicopter despite a well-established crowd line. The pilot should have landed as soon as the child was clear and not taken off again. If things aren’t 100% safe, DON’T DO IT.
Play nice with the FAA (aka don’t be that guy)
The Federal Aviation Administration is still confusing everyone with their rules and mandates, but that doesn’t mean we should ignore them completely. There are a few rules you need to be conscious of so you don’t cross important lines.
- Stay below 400′ AGL (above ground level). This is because normal aircraft can’t fly below 500′ AGL.
- Don’t fly within five miles of an airport, and if you need to, get the airport’s permission first. This includes local municipal airports and helipads as well.
- If you’re seeing a lot of air traffic even if you’re farther than five miles from the airport, use common sense to stay away from full size aircraft.
- Maintain line of sight with your drone. First-person-view systems allow you to fly using your drone’s perspective on a screen or goggles, but you need to be able to navigate back if that system fails.
- Respect no-fly zones. You can find a map of them at this link. It mainly includes areas around airports, national parks, and the area around Washington D.C.
That pretty much sums it up. It’s a good idea to find someone to mentor you in flying, especially if they’re local. Regardless, fly safe and have fun! As a treat for making it all the way to the end of this blog, here’s the Propellerheads Aerial Photography demo reel for 2014:
Propellerheads 2014 Show Reel HD from Parker Gyokeres on Vimeo.
Sam,
I am super proud to have started you on your journey. Thanks for paying it forward!
Pingback: Multicopters deconstructed | Blue Sky Above and a Camera Kit